Set up an environment
Written for Ubuntu. Windows and macOS work the same way; the paths are noted where they differ.
Install a virtual environment
Use qgis-venv-creator (see this article) through pipx (sudo apt install pipx):
pipx run qgis-venv-creator --venv-name ".venv"
Then enter the virtual environment:
. .venv/bin/activate
# or
source .venv/bin/activate
Or use the system Python with access to the QGIS packages:
# create virtual environment linking to system packages (for pyqgis)
python3 -m venv .venv --system-site-packages
source .venv/bin/activate
Install the development dependencies
# bump dependencies inside venv
python -m pip install -U pip
python -m pip install -U -r requirements/development.txt

# install git hooks (pre-commit)
pre-commit install
A dedicated QGIS profile
We recommend a dedicated QGIS profile for the development of the plugin, to avoid conflicts with other plugins.
From the command line (a terminal with the qgis executable in
PATH, or the OSGeo4W Shell):# Linux qgis --profile plg_geoserver_manager # Windows - OSGeo4W Shell qgis-ltr --profile plg_geoserver_manager # Windows - PowerShell opened in the QGIS installation directory PS C:\Program Files\QGIS 3.40.4\LTR\bin> .\qgis-ltr-bin.exe --profile plg_geoserver_manager
Then set the
QGIS_PLUGINPATHenvironment variable to the path of the plugin, in the profile preferences: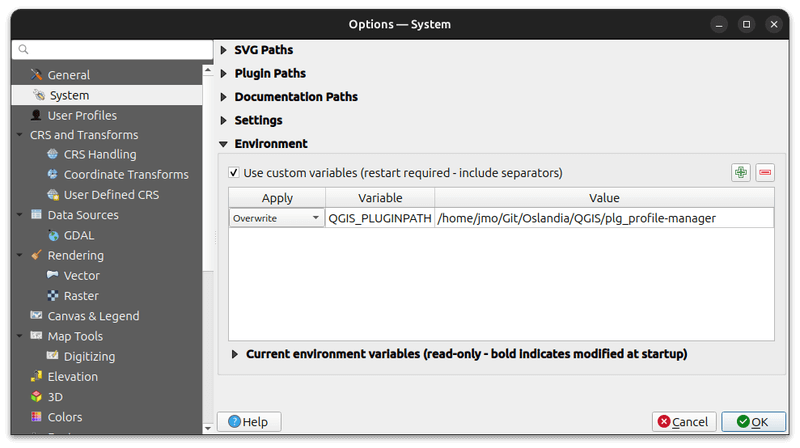
Enable the plugin in the plugin manager. Ignore the invalid folders, such as the documentation and the tests:
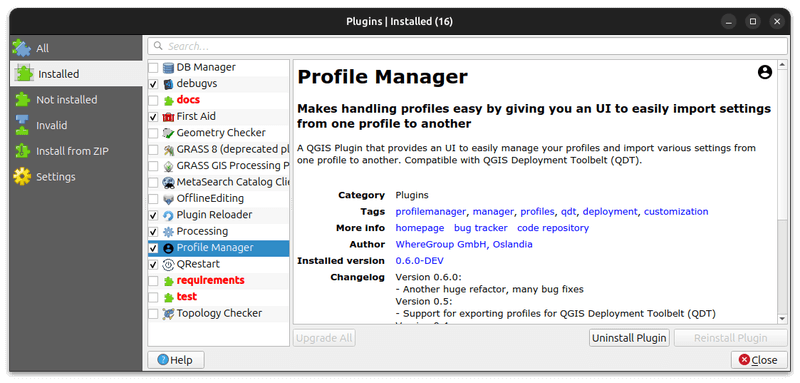
The plugin is experimental=True, so Show also experimental plugins must
be on in the plugin manager. Before you assume the default profile, check
which profile QGIS starts: lastProfile in profiles.ini.
A local GeoServer to test against
docker-compose.yml in the repository root starts a throwaway GeoServer and
a PostGIS database:
docker compose up -d
docker compose ps          # wait until gsm-geoserver is "healthy"
GeoServer |
http://localhost:8080/geoserver, |
Database, as seen from GeoServer |
host |
Configure the plugin with that URL, user name and password in Settings → Options → GeoServer Manager.
The server includes demo workspaces, stores, layers, styles and layer groups. Use them to exercise the listings, the search, the pagination and the editing of resources.
For the empty first-run state, “no workspaces yet”, which the Add flows and the “create a workspace first” warning are about:
docker compose down -v && SKIP_DEMO_DATA=true docker compose up -d
The -v matters: the demo data is unpacked only when the data-dir volume is
created, so flipping the variable on an existing volume changes nothing.
PostGIS is part of the stack on purpose. “PostGIS” is the plugin’s main
datastore type. Without a reachable database a created store looks fine but
serves nothing, so the interesting edit behaviour cannot be tested. Use the
postgis host name, not localhost. GeoServer resolves it on the compose
network, which is why the database port is not published to the host.
A PMTiles datastore config can be created against vanilla GeoServer, but
serving from one needs the community module; see the commented
COMMUNITY_EXTENSIONS lines in docker-compose.yml.
docker compose down -v # stop and discard both volumes
Load the plugin with a symlink
Instead of the environment variable, symlink the geoserver_manager package
into the profile’s plugin folder. QGIS then loads the working tree directly,
and only sees the plugin package, not the repository’s docs/, tests/ and
the rest:
# Linux, dedicated profile
ln -s "${PWD}/geoserver_manager" \
  "$HOME/.local/share/QGIS/QGIS3/profiles/plg_geoserver_manager/python/plugins/"
On macOS the profiles live in $HOME/Library/Application Support/QGIS/QGIS3,
on Windows in %APPDATA%\QGIS\QGIS3 (use New-Item -ItemType SymbolicLink
from an administrator PowerShell).
There is no build step: the geoservercloud and xmltodict wheels in
geoserver_manager/extras/ are committed. Restart QGIS, or use
Plugin Reloader to pick
up code changes without a restart.