User guide
This page describes the dialog, one tab at a time. If you are new to the plugin, start with the quick start.
The dialog
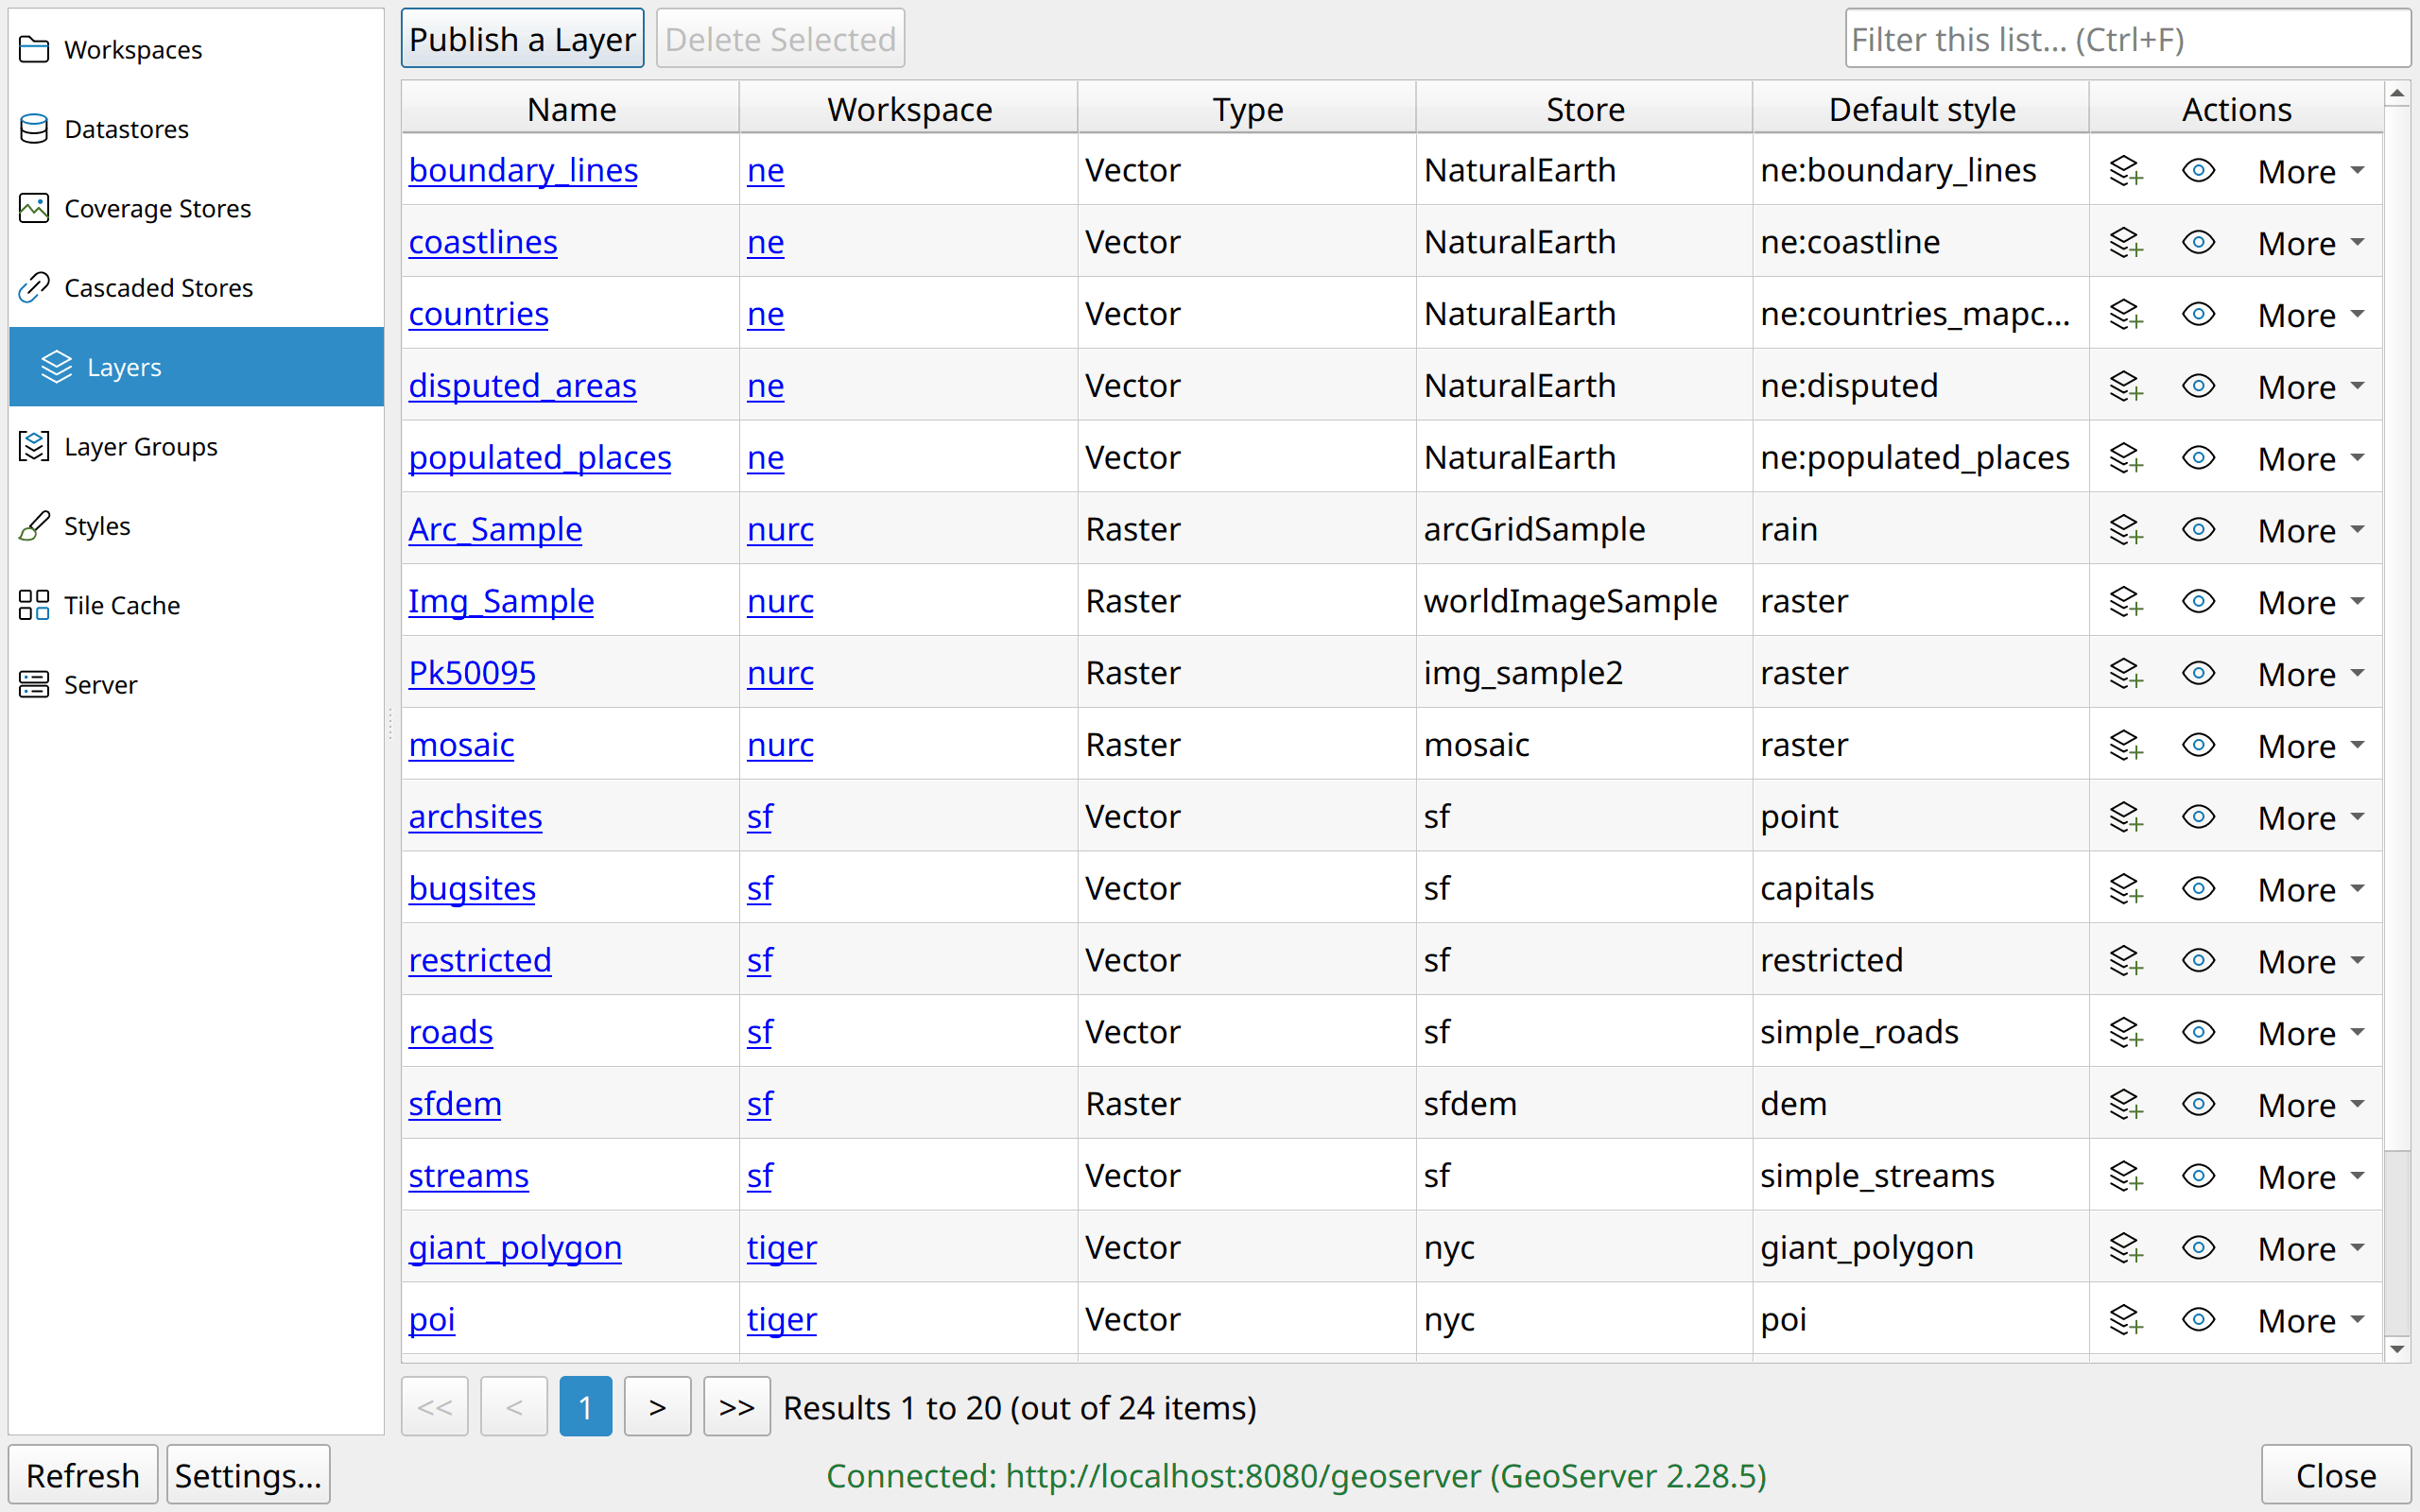
The Layers tab of a connected dialog.
Left: the list of resource types. Click one to open its tab.
Top: the button that adds or publishes, Delete Selected, and the search box.
Middle: the table. Every list loads in the background, so QGIS stays usable while the table fills.
Right column: the actions of each row. Frequent actions are buttons. The other actions are in the More menu (or the Actions menu, when every action is in the menu).
Bottom: the page buttons, then Refresh, Settings and the connection status. With 2 or more saved connections, a list beside the status switches to another server and reloads the open tab.
Working with a list:
Search filters the list by every column loaded so far (see Good to know). Press Ctrl+F to go to the search box. Press Esc to clear it. Press Enter to go from the search box to the results.
Sort by a column: click its header. Click the header again to reverse the order.
Open a resource: click its name, or select the row and press Enter. The Workspace column opens that workspace.
Delete the selected rows with Delete Selected, or with the Del key.
Opening a form or a details view reads from the server first. If the server is slow to answer, a Waiting for GeoServer box appears, with Cancel. A server that went away never freezes QGIS. A save waits the same way. Its request is already sent, so after a Cancel the server can still apply it, and the tab reloads when GeoServer answers. Until then, the task list of QGIS shows GeoServer Manager: saving…, and QGIS does not quit before the save ends.
A form refuses bad input before it closes, and keeps what you typed. Bad input is a name that is taken, a layer that is not on the server, or a zoom range that ends before it starts. In the picker of a list, Enter adds the name. Esc, Cancel and the close button of the window ask before they discard an edit.
Every delete asks first, and says what else goes with it. GeoServer deletes recursively: a workspace takes its stores, layers and styles with it.
Workspaces
A workspace groups stores, layers and styles, like a folder.
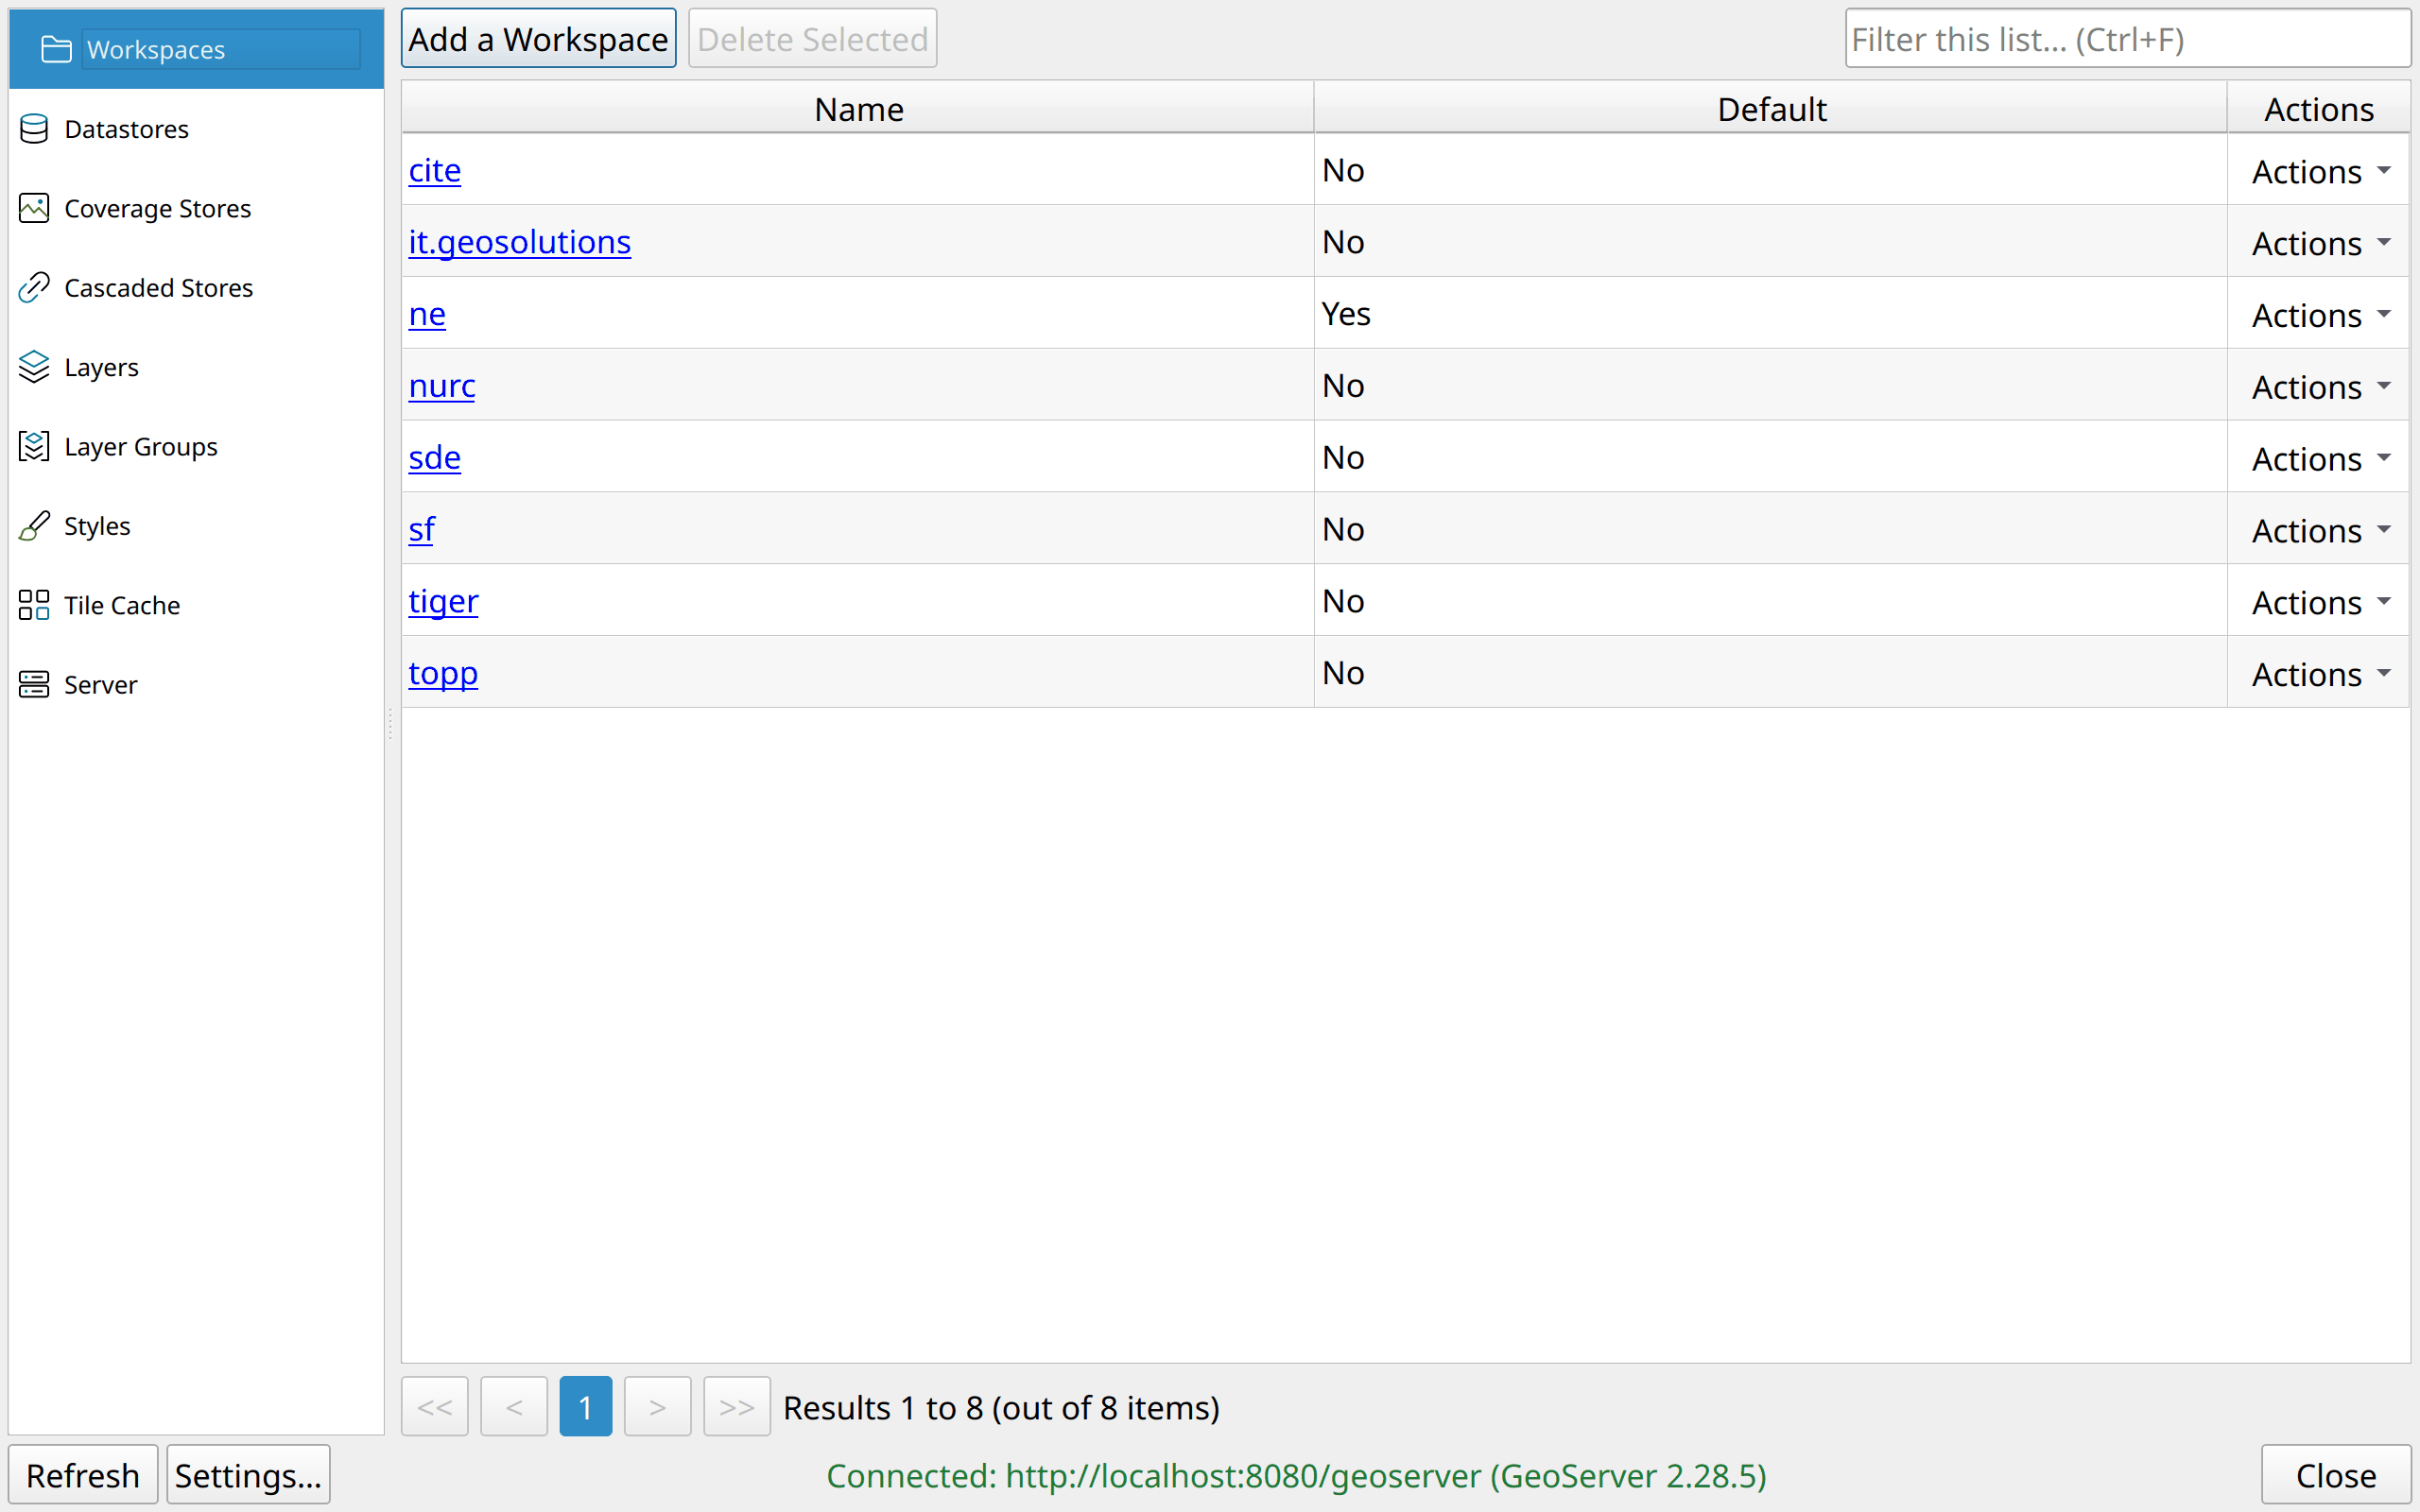
Add a Workspace: give it a name. The namespace URI is optional: WFS and GML qualify the features with it, and it is
http://nameotherwise. Make the workspace isolated or the default if needed. The name starts with a letter or_, and holds only letters, digits,_,-and., as in GeoServer’s own form. The form refuses any other name before it closes, and refuses a rename to such a name too.Click a name to edit a workspace: rename it, change its namespace URI or its isolation, or make it the default. The WMS, WFS, WCS and WMTS tabs give the workspace service settings of its own.
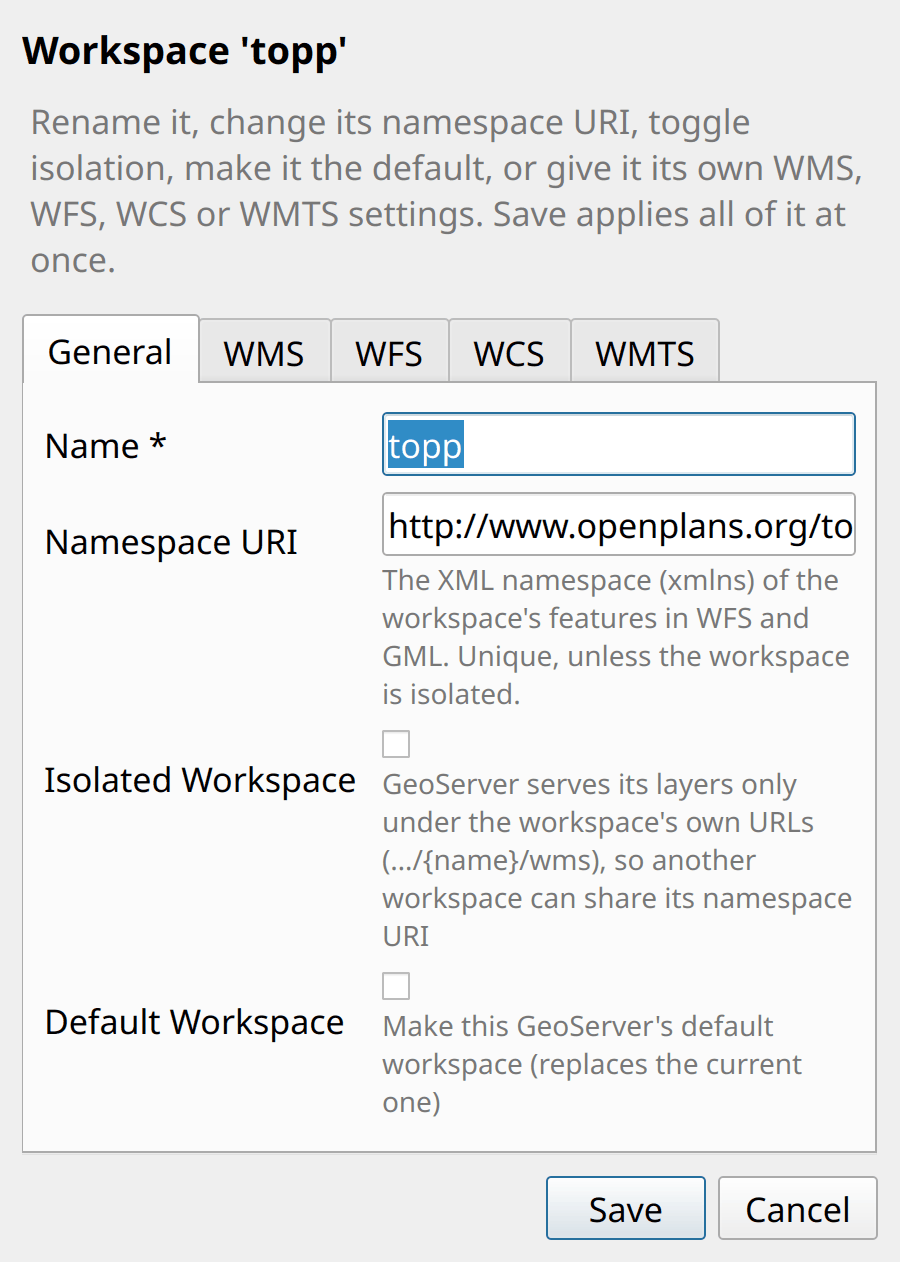
Editing a workspace.
GeoServer always has exactly one default workspace. On the current default, the box is read-only: make another workspace the default instead. Unticking Own settings on the tab of a service removes those settings, and the workspace uses the global ones again. Ticked on a workspace that had none, the fields start from the global settings, which the Server tab edits.
Datastores
A datastore is where GeoServer reads vector data from: a database, or files on the server.
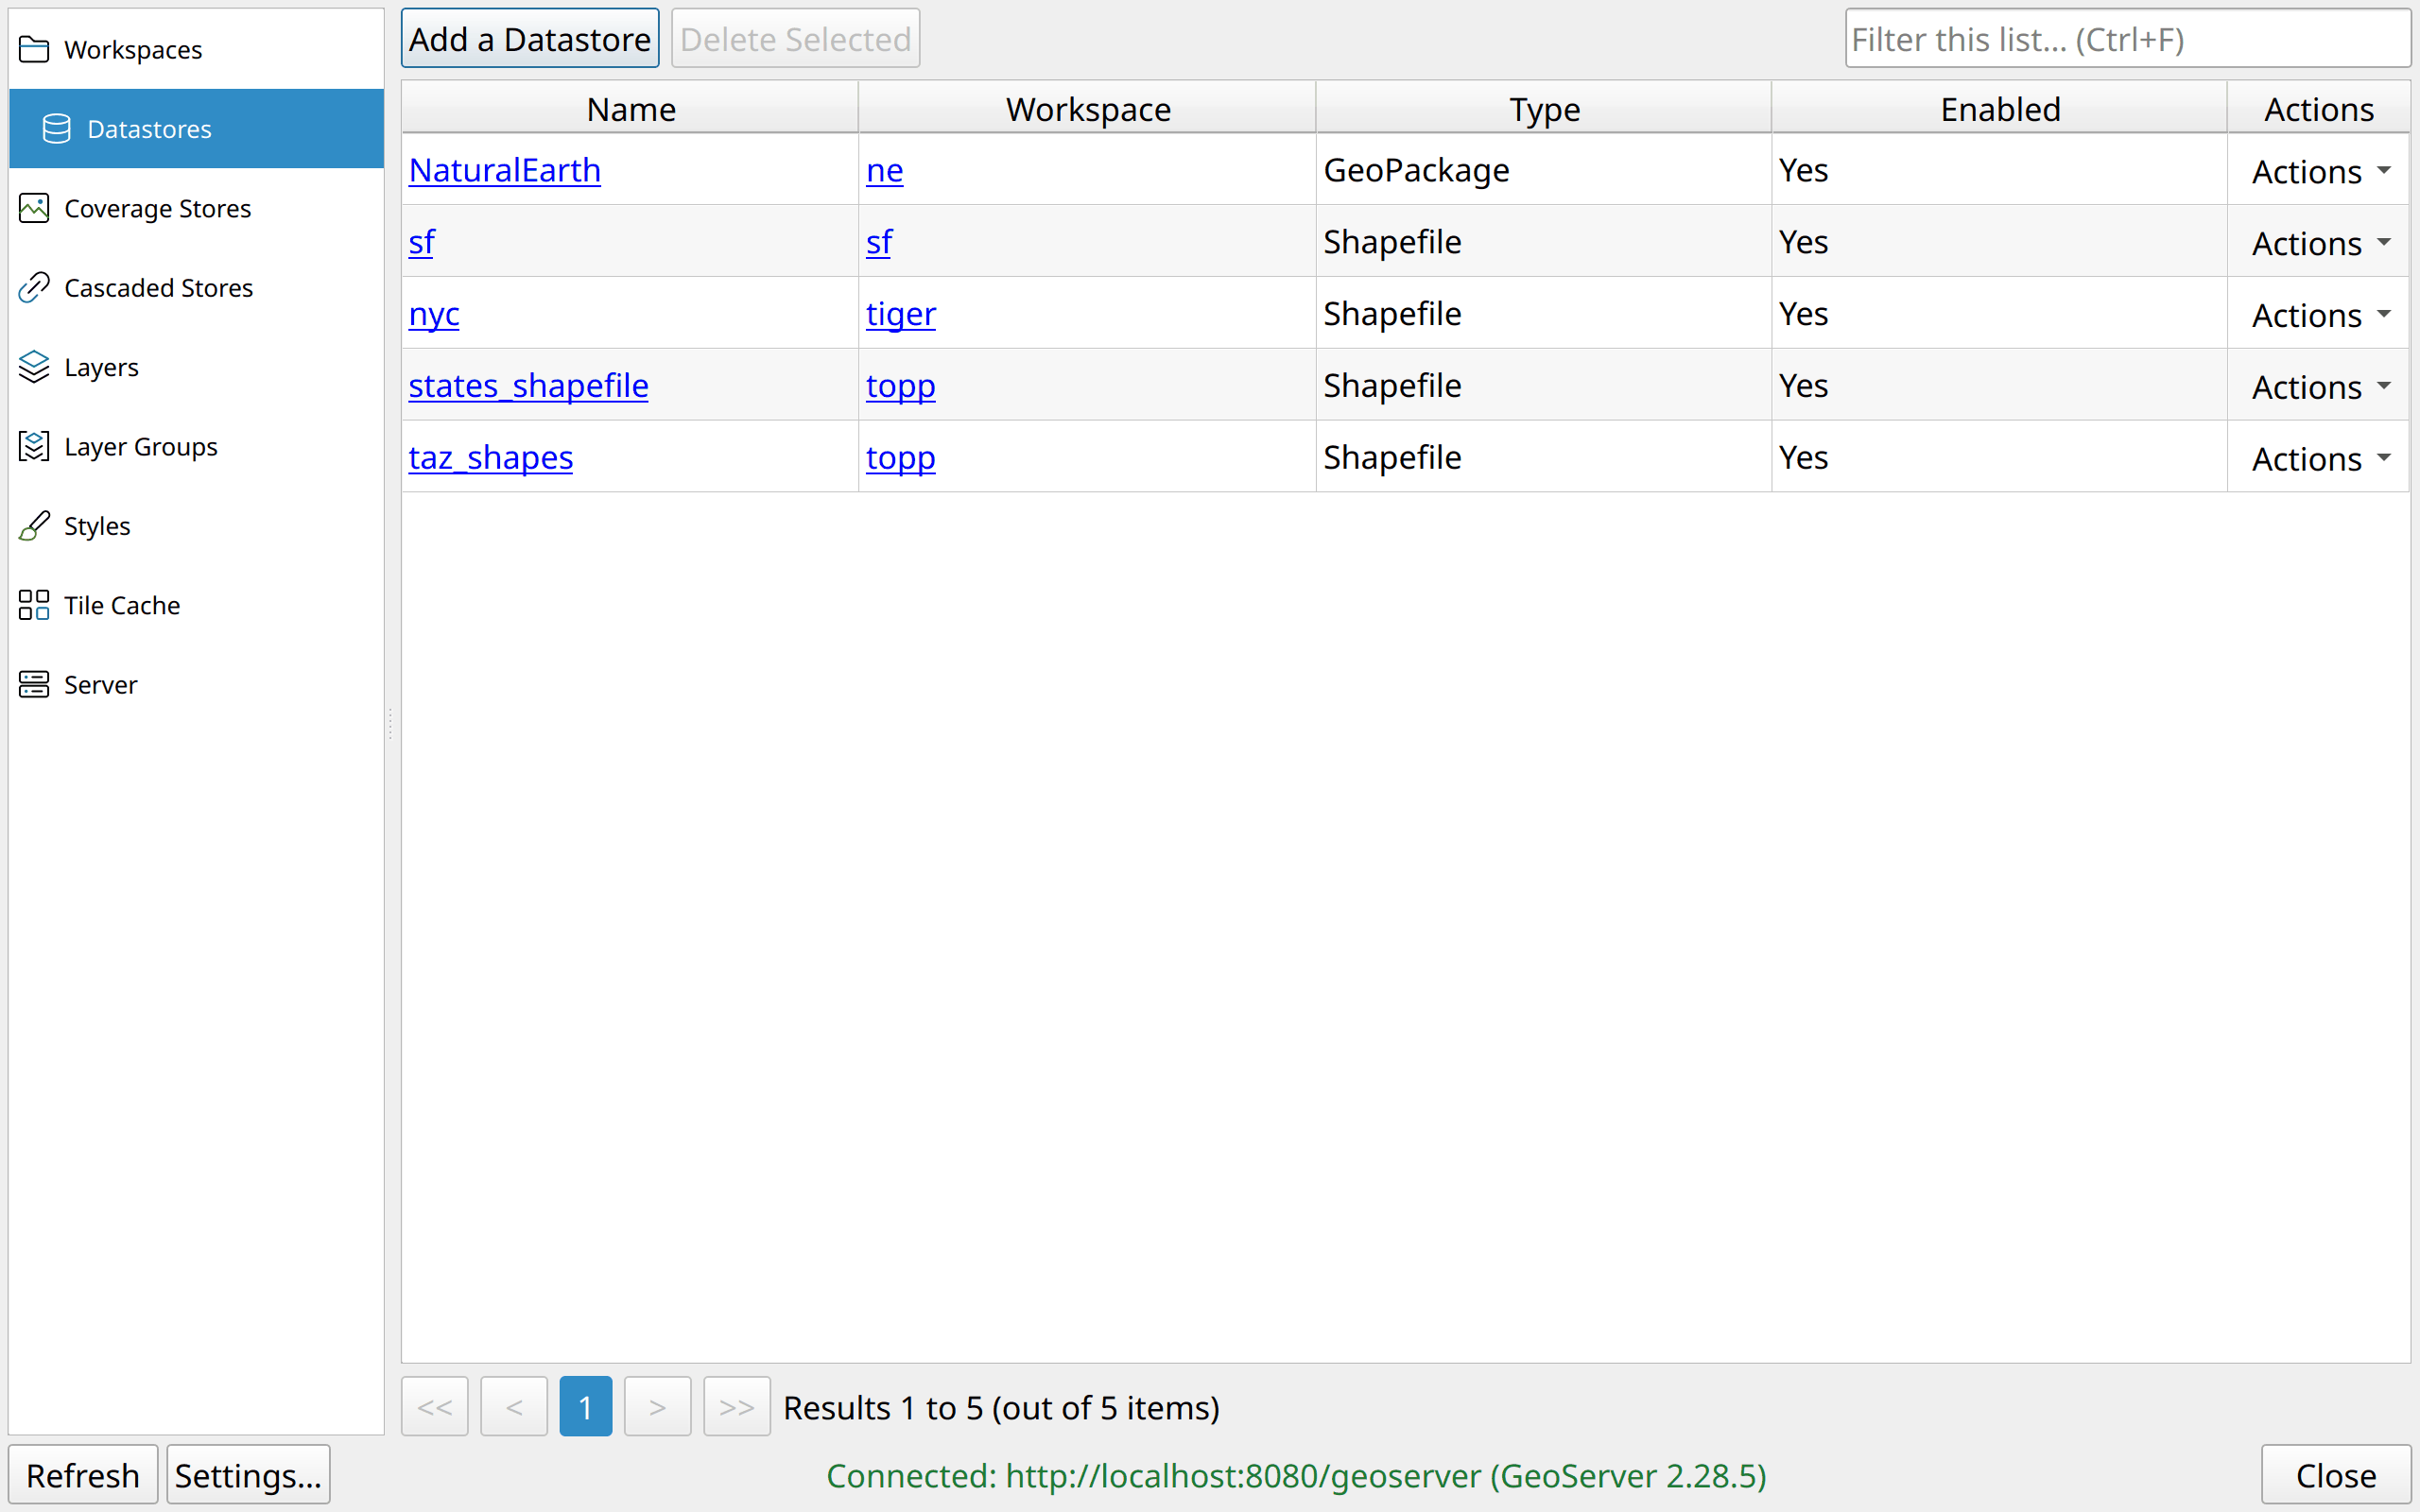
Add a Datastore has a form for each common type:
Type |
What it connects to |
|---|---|
PostGIS, PostGIS (JNDI) |
a PostGIS database |
Shapefile |
one shapefile on the server |
Directory of spatial files |
a folder of shapefiles on the server |
GeoPackage |
a GeoPackage file on the server |
PMTiles |
a PMTiles archive |
Web Feature Server (NG) |
a remote WFS, whose feature types then publish like tables |
Other… |
any other type GeoServer has (Properties, CSV, Oracle…), typed by its name |
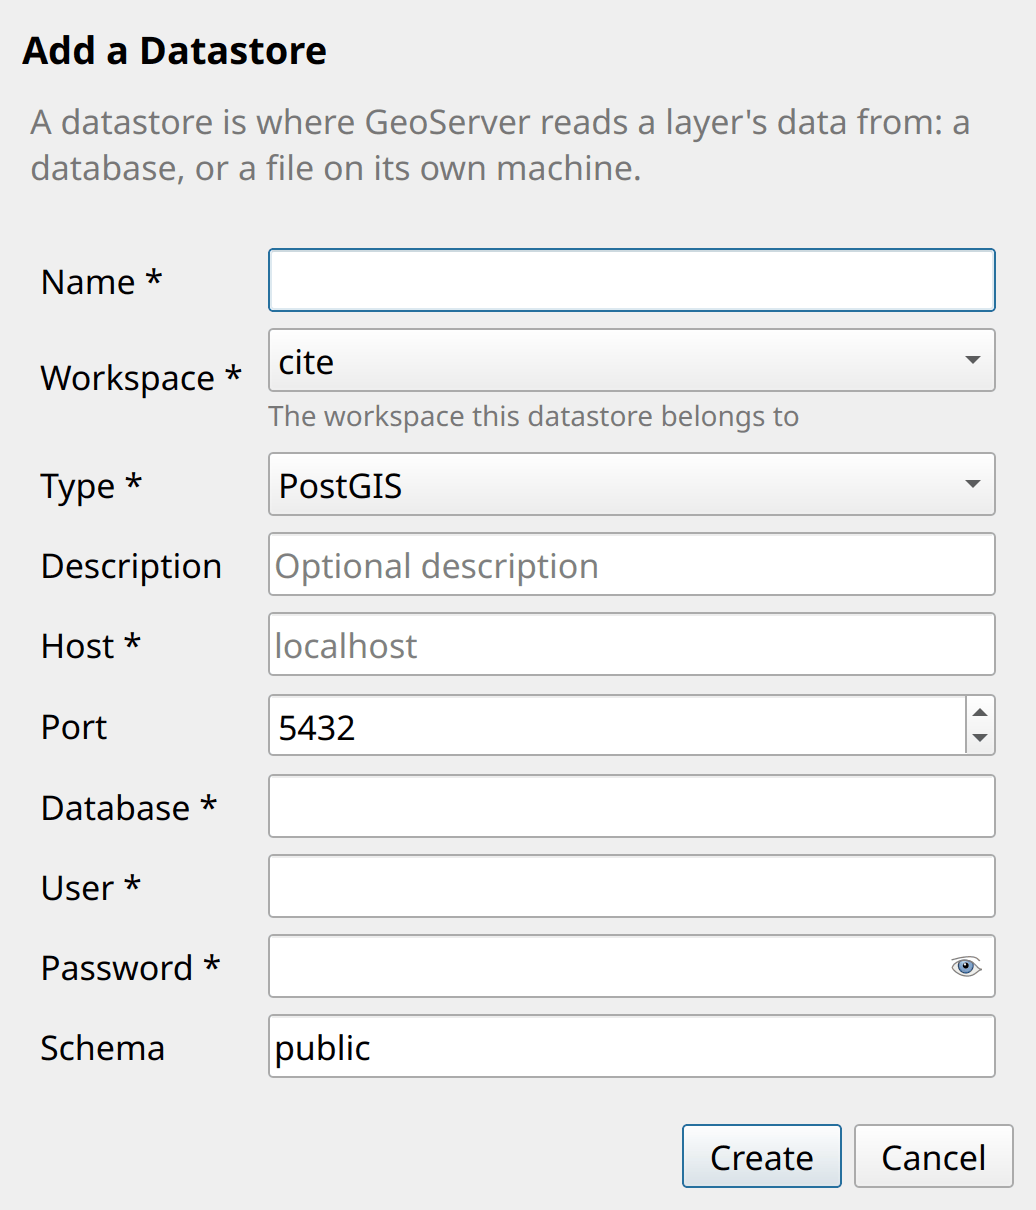
The fields of the chosen type show right under it.
Other… and any type the plugin has no form for get a table of parameters and their values, exactly as GeoServer stores them.
Click a name to edit a store, or to enable or disable it. Good to know:
A rename keeps the feature types, layers, layer groups and tile cache of the store.
The password field is always blank, because GeoServer only returns the password encrypted. Leave the field empty to keep the stored password, or type a new one. The eye in the box shows what you typed.
The Advanced tab lists every other connection parameter (pool size, timeouts, Loose bbox…) in a table. Change, add or remove a row there. A removed row removes the parameter.
After a save, the plugin asks GeoServer to open the store. If GeoServer cannot (a wrong host, password or path), a warning says so at once, with the reason GeoServer gives.
Row action: Reset makes GeoServer read the store again, after its tables or files changed outside GeoServer.
Coverage stores
A coverage store holds raster data, such as a GeoTIFF.
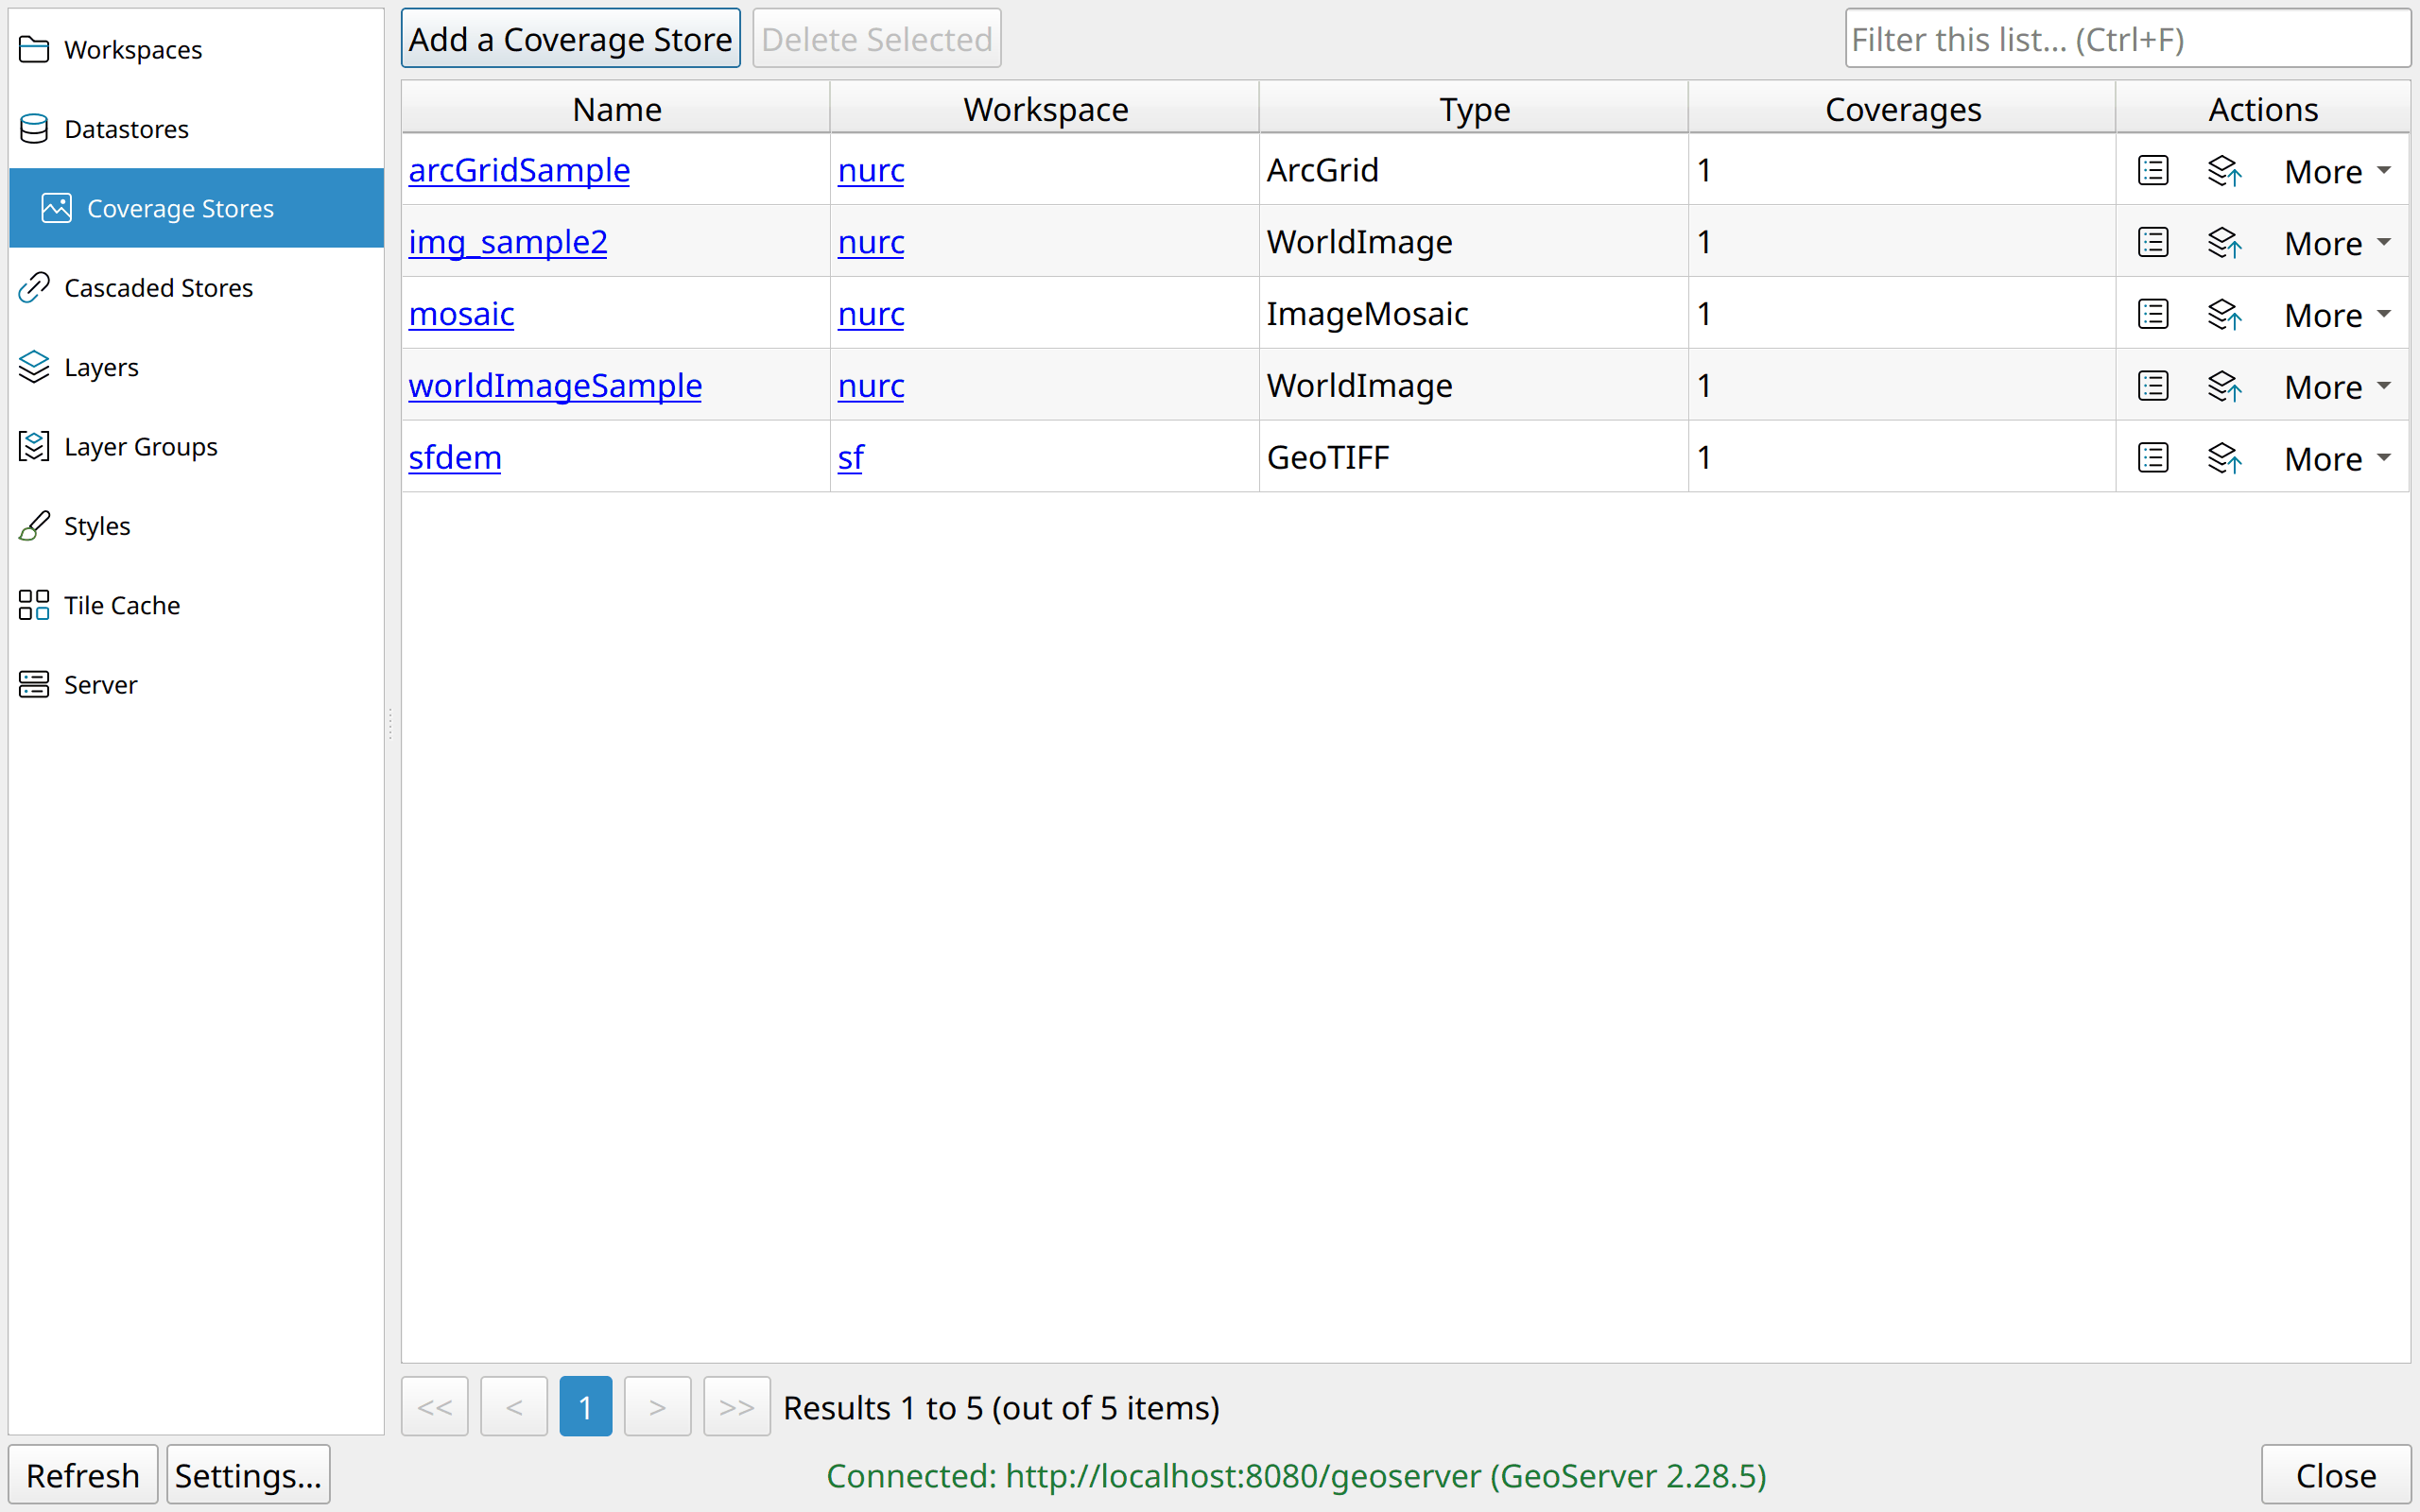
Add a Coverage Store takes one of these sources:
A GeoTIFF path on the GeoServer machine.
A COG (Cloud Optimized GeoTIFF) URL.
An ArcGrid or a WorldImage URL (a PNG, JPEG or GIF with its world file).
An ImageMosaic: a folder on the server, or a properties ZIP to upload.
A raster layer from this QGIS project.
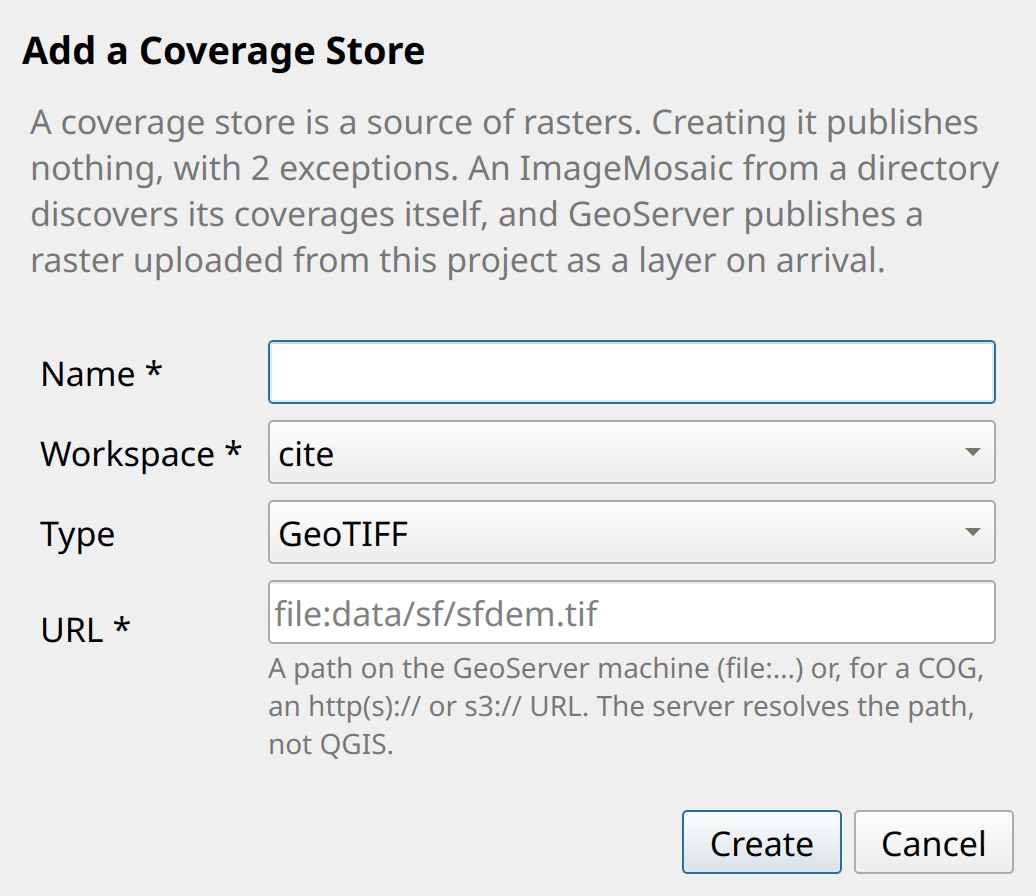
The last source uploads your raster. The plugin writes it to a compressed GeoTIFF first, unless it already is a plain local GeoTIFF. GeoServer then creates the store, the coverage and the layer in one request. Tick Replace it if it already exists to overwrite an earlier upload. The form refuses a layer without an EPSG code before anything is sent.
Click a name to edit a store: its name, URL, description, and whether it is enabled. A rename keeps its coverages and layers. After a save, a warning says so at once if GeoServer cannot read the file.
Row actions: Coverages lists the coverages a store publishes, with their details. Publish a coverage turns a coverage the store holds, but does not publish yet, into a layer. Reset makes GeoServer read the store again, after its file was replaced or a mosaic changed.
Cascaded stores
A cascaded store shows the WMS or WMTS layers of another server through your GeoServer.
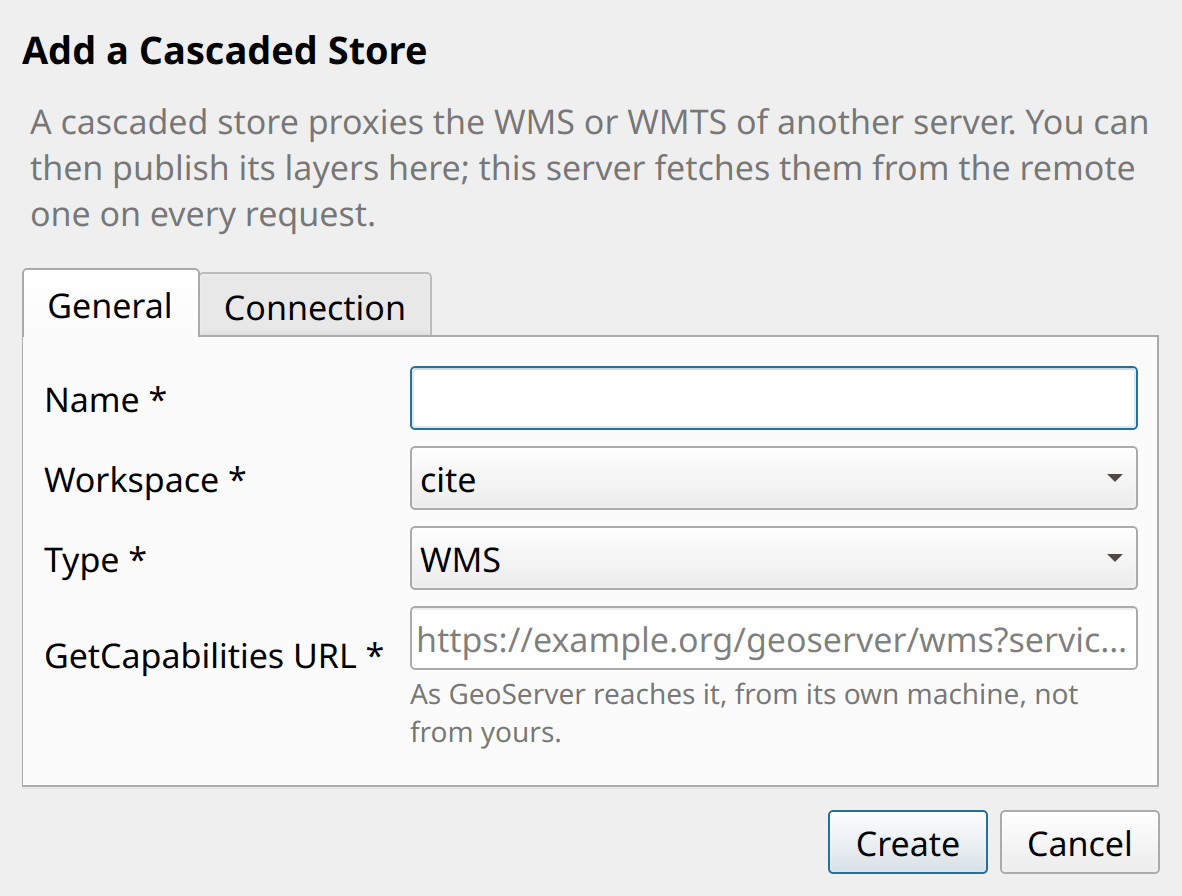
Adding a cascaded store: the GetCapabilities URL of the remote server, plus a user name and password on the Connection tab when the remote server needs them.
Add a Cascaded Store: give it a name, pick the workspace and WMS or WMTS, and paste the GetCapabilities URL of the remote server. The Connection tab takes a user name and password for a remote server that asks for them, the number of connections, and the timeouts.
Click a name to edit a store: its URL, user name and password, limits, and whether it is enabled. The password field is always blank. Leave it empty to keep the password, or type a new one to replace it. Clear the user name and the password to stop authenticating. GeoServer refuses to rename a cascaded store. After a save, a warning says so at once if GeoServer cannot read the remote capabilities.
Publish a layer: pick one of the layers the remote server advertises. GeoServer reads its title, SRS and bounds from the remote capabilities.
Cascaded layers: the layers already published from this store.
The plugin never changes the remote server.
Layers
Every layer on the server, whatever its type: vector, raster, cascaded WMS or WMTS.
Publish a layer
Publish a Layer has two sources:
A table in a datastore: pick the workspace, the datastore and the table. Give the EPSG code of its SRS: type it, or look it up with the globe button in the box. A title, an abstract and keywords are optional.
A layer from this QGIS project: the plugin uploads a vector as a GeoPackage, and a raster as a GeoTIFF. GeoServer creates the store and the layer in one request. The QGIS symbology of a vector becomes its default style.
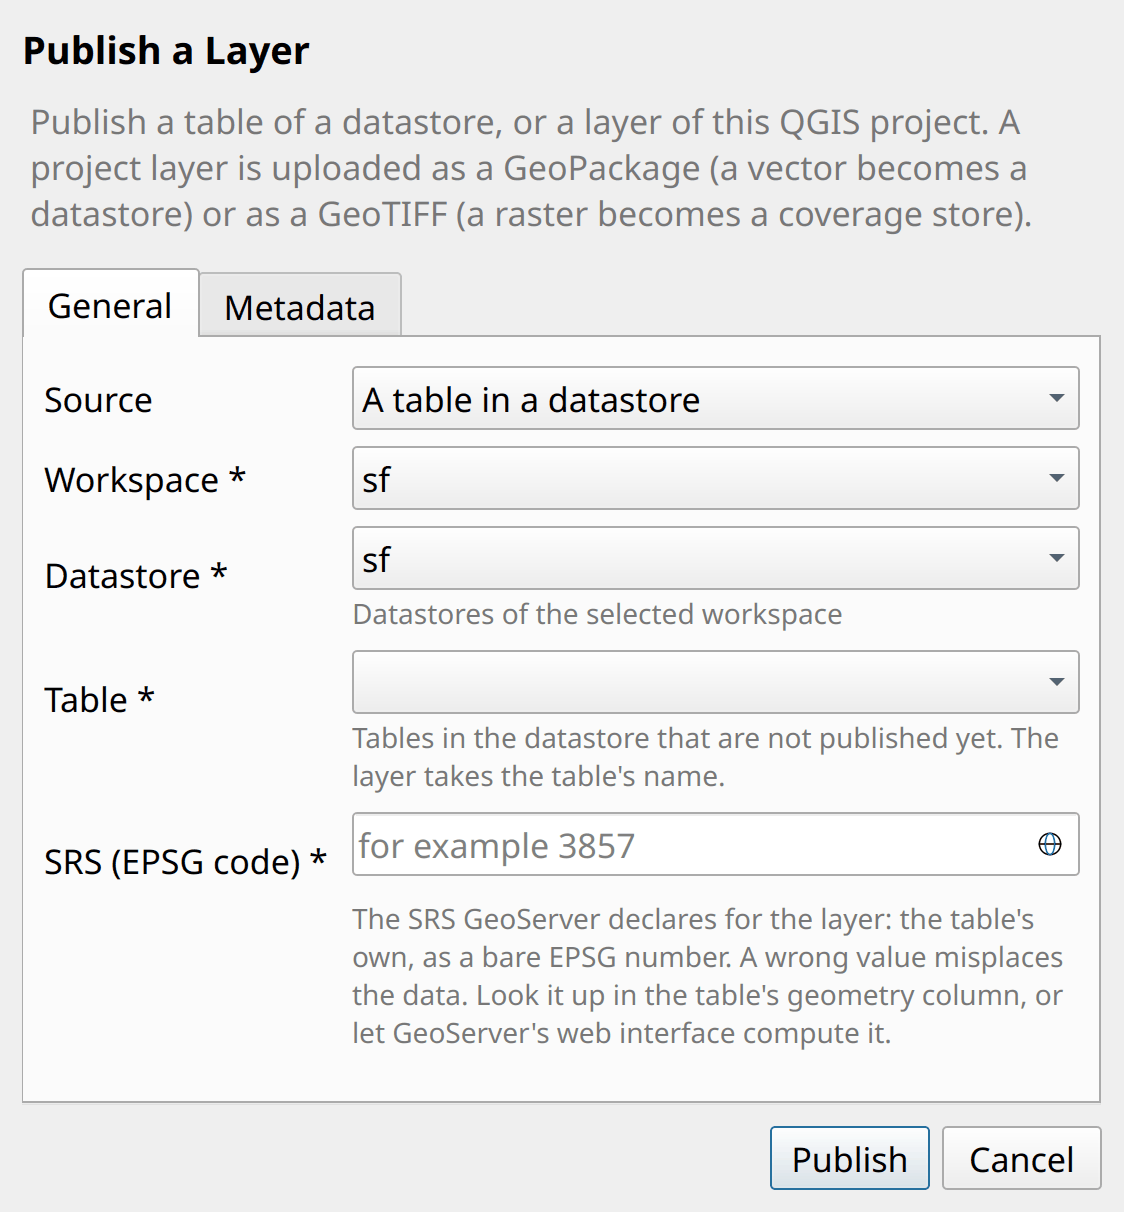
Publishing a table. The Table list only offers the tables not published yet.
The upload runs as a QGIS task. The task bar shows its progress, and the
Refresh button turns into Cancel. The plugin first makes the layer
name safe for GeoServer: spaces and symbols become _, and accents are
dropped (Rivière becomes Riviere). The plugin reprojects a vector whose CRS has
no EPSG code to EPSG:4326 on the way. It refuses a raster in such a CRS
instead, because rasters are uploaded as they are: reproject the raster in
QGIS first.
Row actions
Icon |
Action |
What it does |
|---|---|---|
Layers with a plus |
Add to QGIS |
Load the layer as WMS, WMTS or (for a vector) WFS. With the encrypted store, the project file holds only an authentication id, never the password. |
Eye |
Preview |
Show the layer on a map inside QGIS, without adding it to the project. |
Browser with an arrow |
Preview in a browser |
Open GeoServer’s own preview page on the extent of the layer. |
Brush |
Set style |
Pick the default style, and the other styles a client can ask for. |
Brush with an up arrow |
Push style from QGIS |
Upload the symbology of a project layer and make it the default style. |
Arrow around a database |
Update from the data |
After the table gained a column or the file was replaced: GeoServer reads the data again and recomputes the bounds. |
Bin |
Delete |
Delete the layer, after a confirmation. |
The first two are buttons; the other actions are in the More menu.
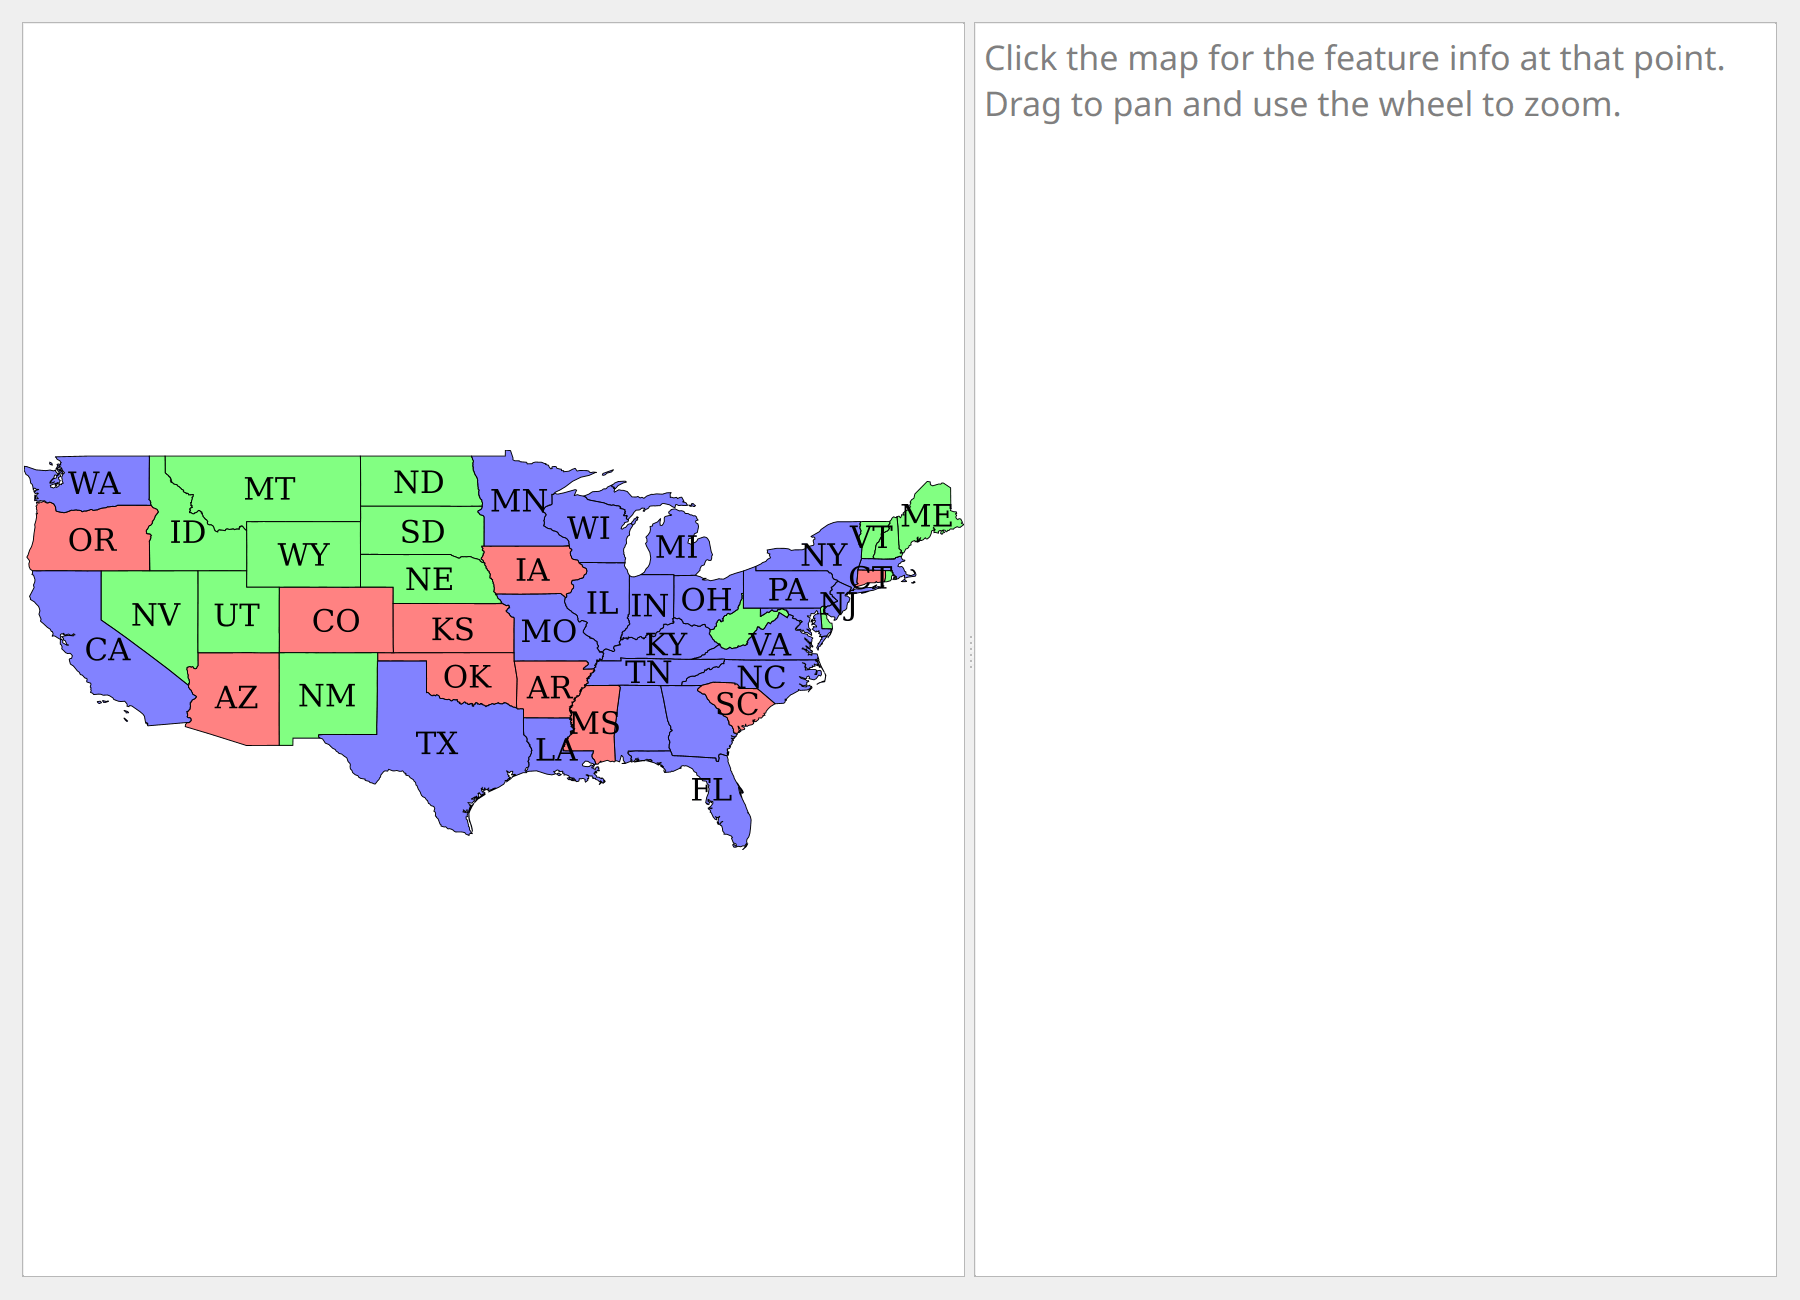
Preview: drag to pan, scroll to zoom, click a feature for its attributes.
Edit a layer
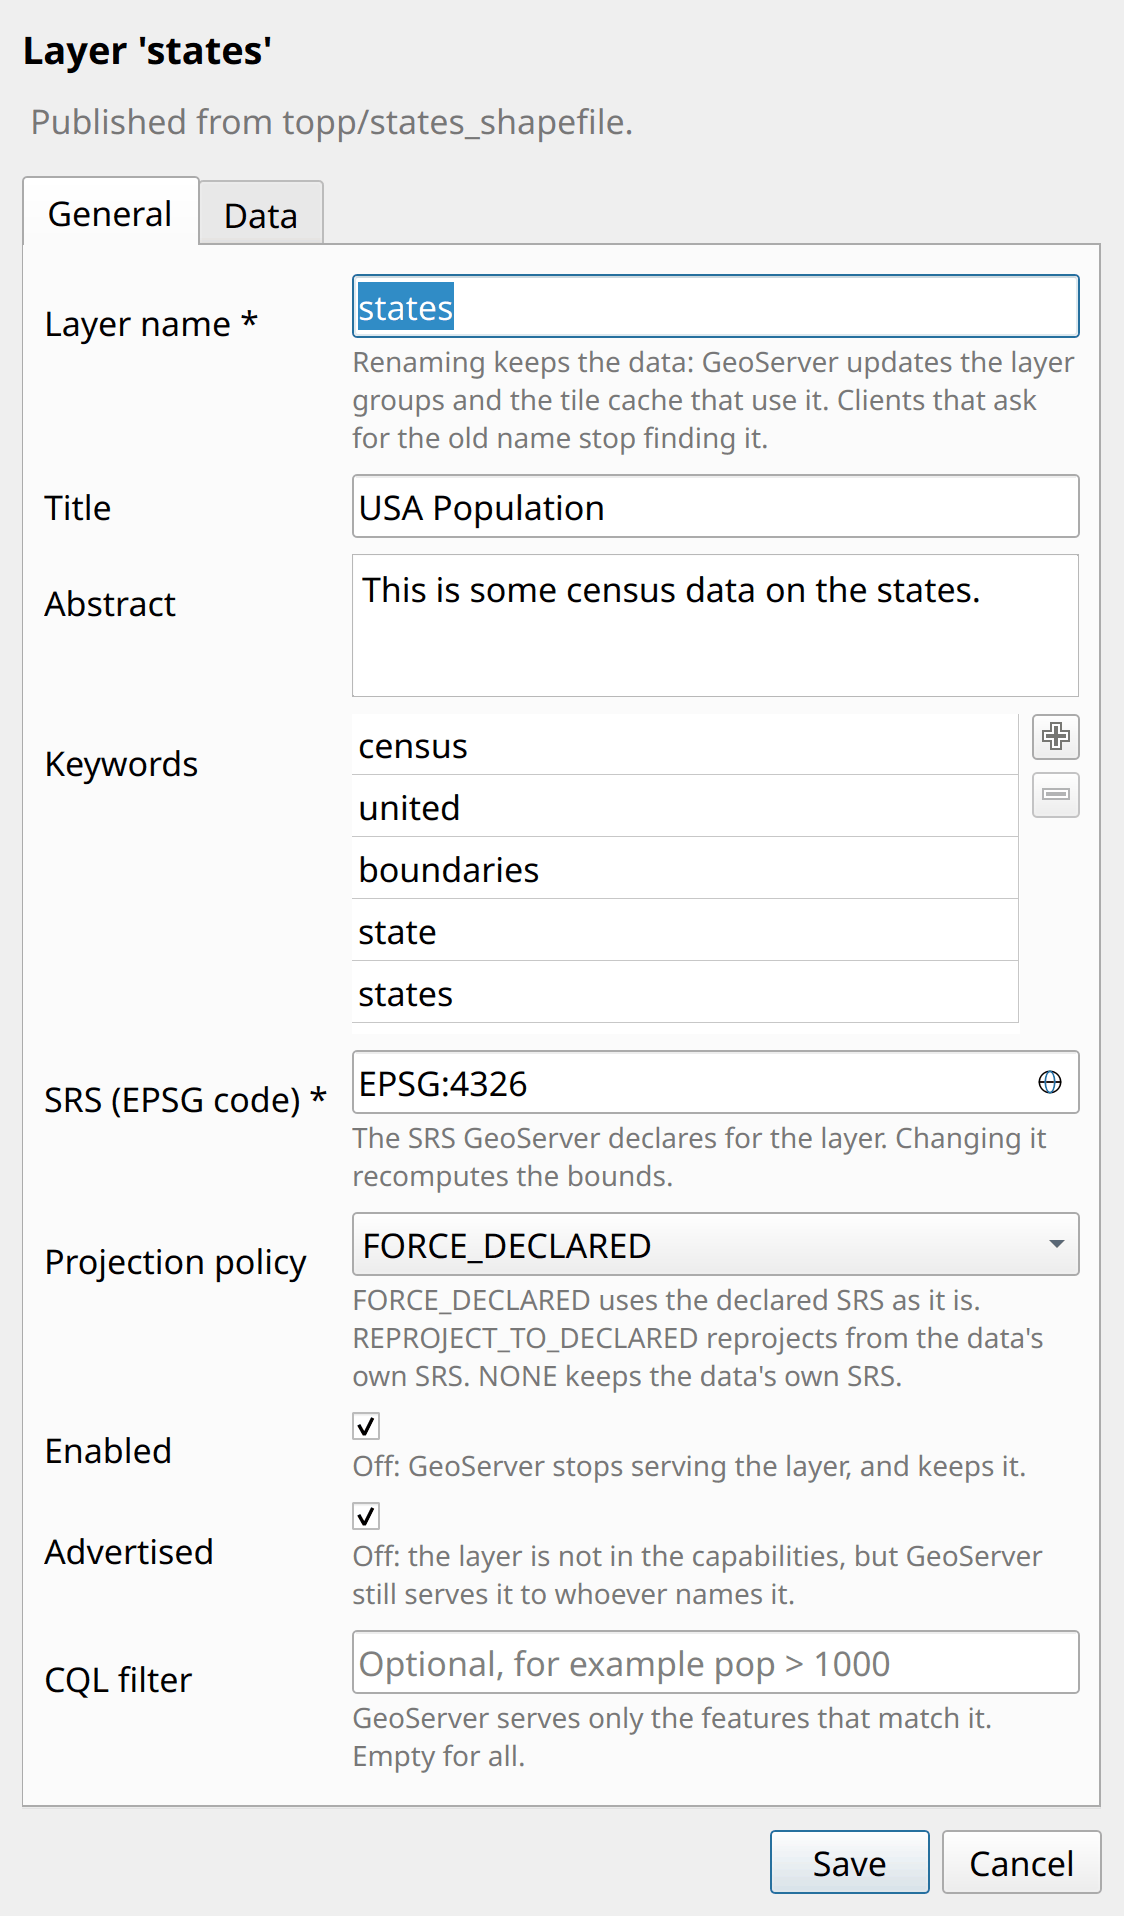
Click the name of a layer to edit it. The first tab holds what you can change:
Layer name: a rename keeps the data, and GeoServer updates the layer groups and the tile cache that use the layer. Clients that ask for the old name stop finding it.
Title, Abstract and Keywords: what the capabilities show.
SRS and Projection policy: a change of either recomputes the bounds. The globe button in the SRS box opens the CRS picker of QGIS. You can still type a code QGIS does not know, such as
EPSG:900913.Enabled: off stops GeoServer serving the layer, and keeps it.
Advertised: off leaves the layer out of the capabilities, but GeoServer still serves it to whoever names it.
CQL filter (vector layers): GeoServer serves only the matching features.
Save sends only what you changed, so everything else the layer has stays as it is. The Data tab shows the native name, the store, the bounds and the attributes (or the size and bands of a raster).
A cascaded layer stays read-only: the REST API of GeoServer cannot change one, so GeoServer’s web interface is the place for that. A cascaded WMS layer also keeps the default style of the remote server. Set style offers its other styles only, and Push style from QGIS uploads the style without assigning it.
Layer groups
A layer group publishes several layers as one.
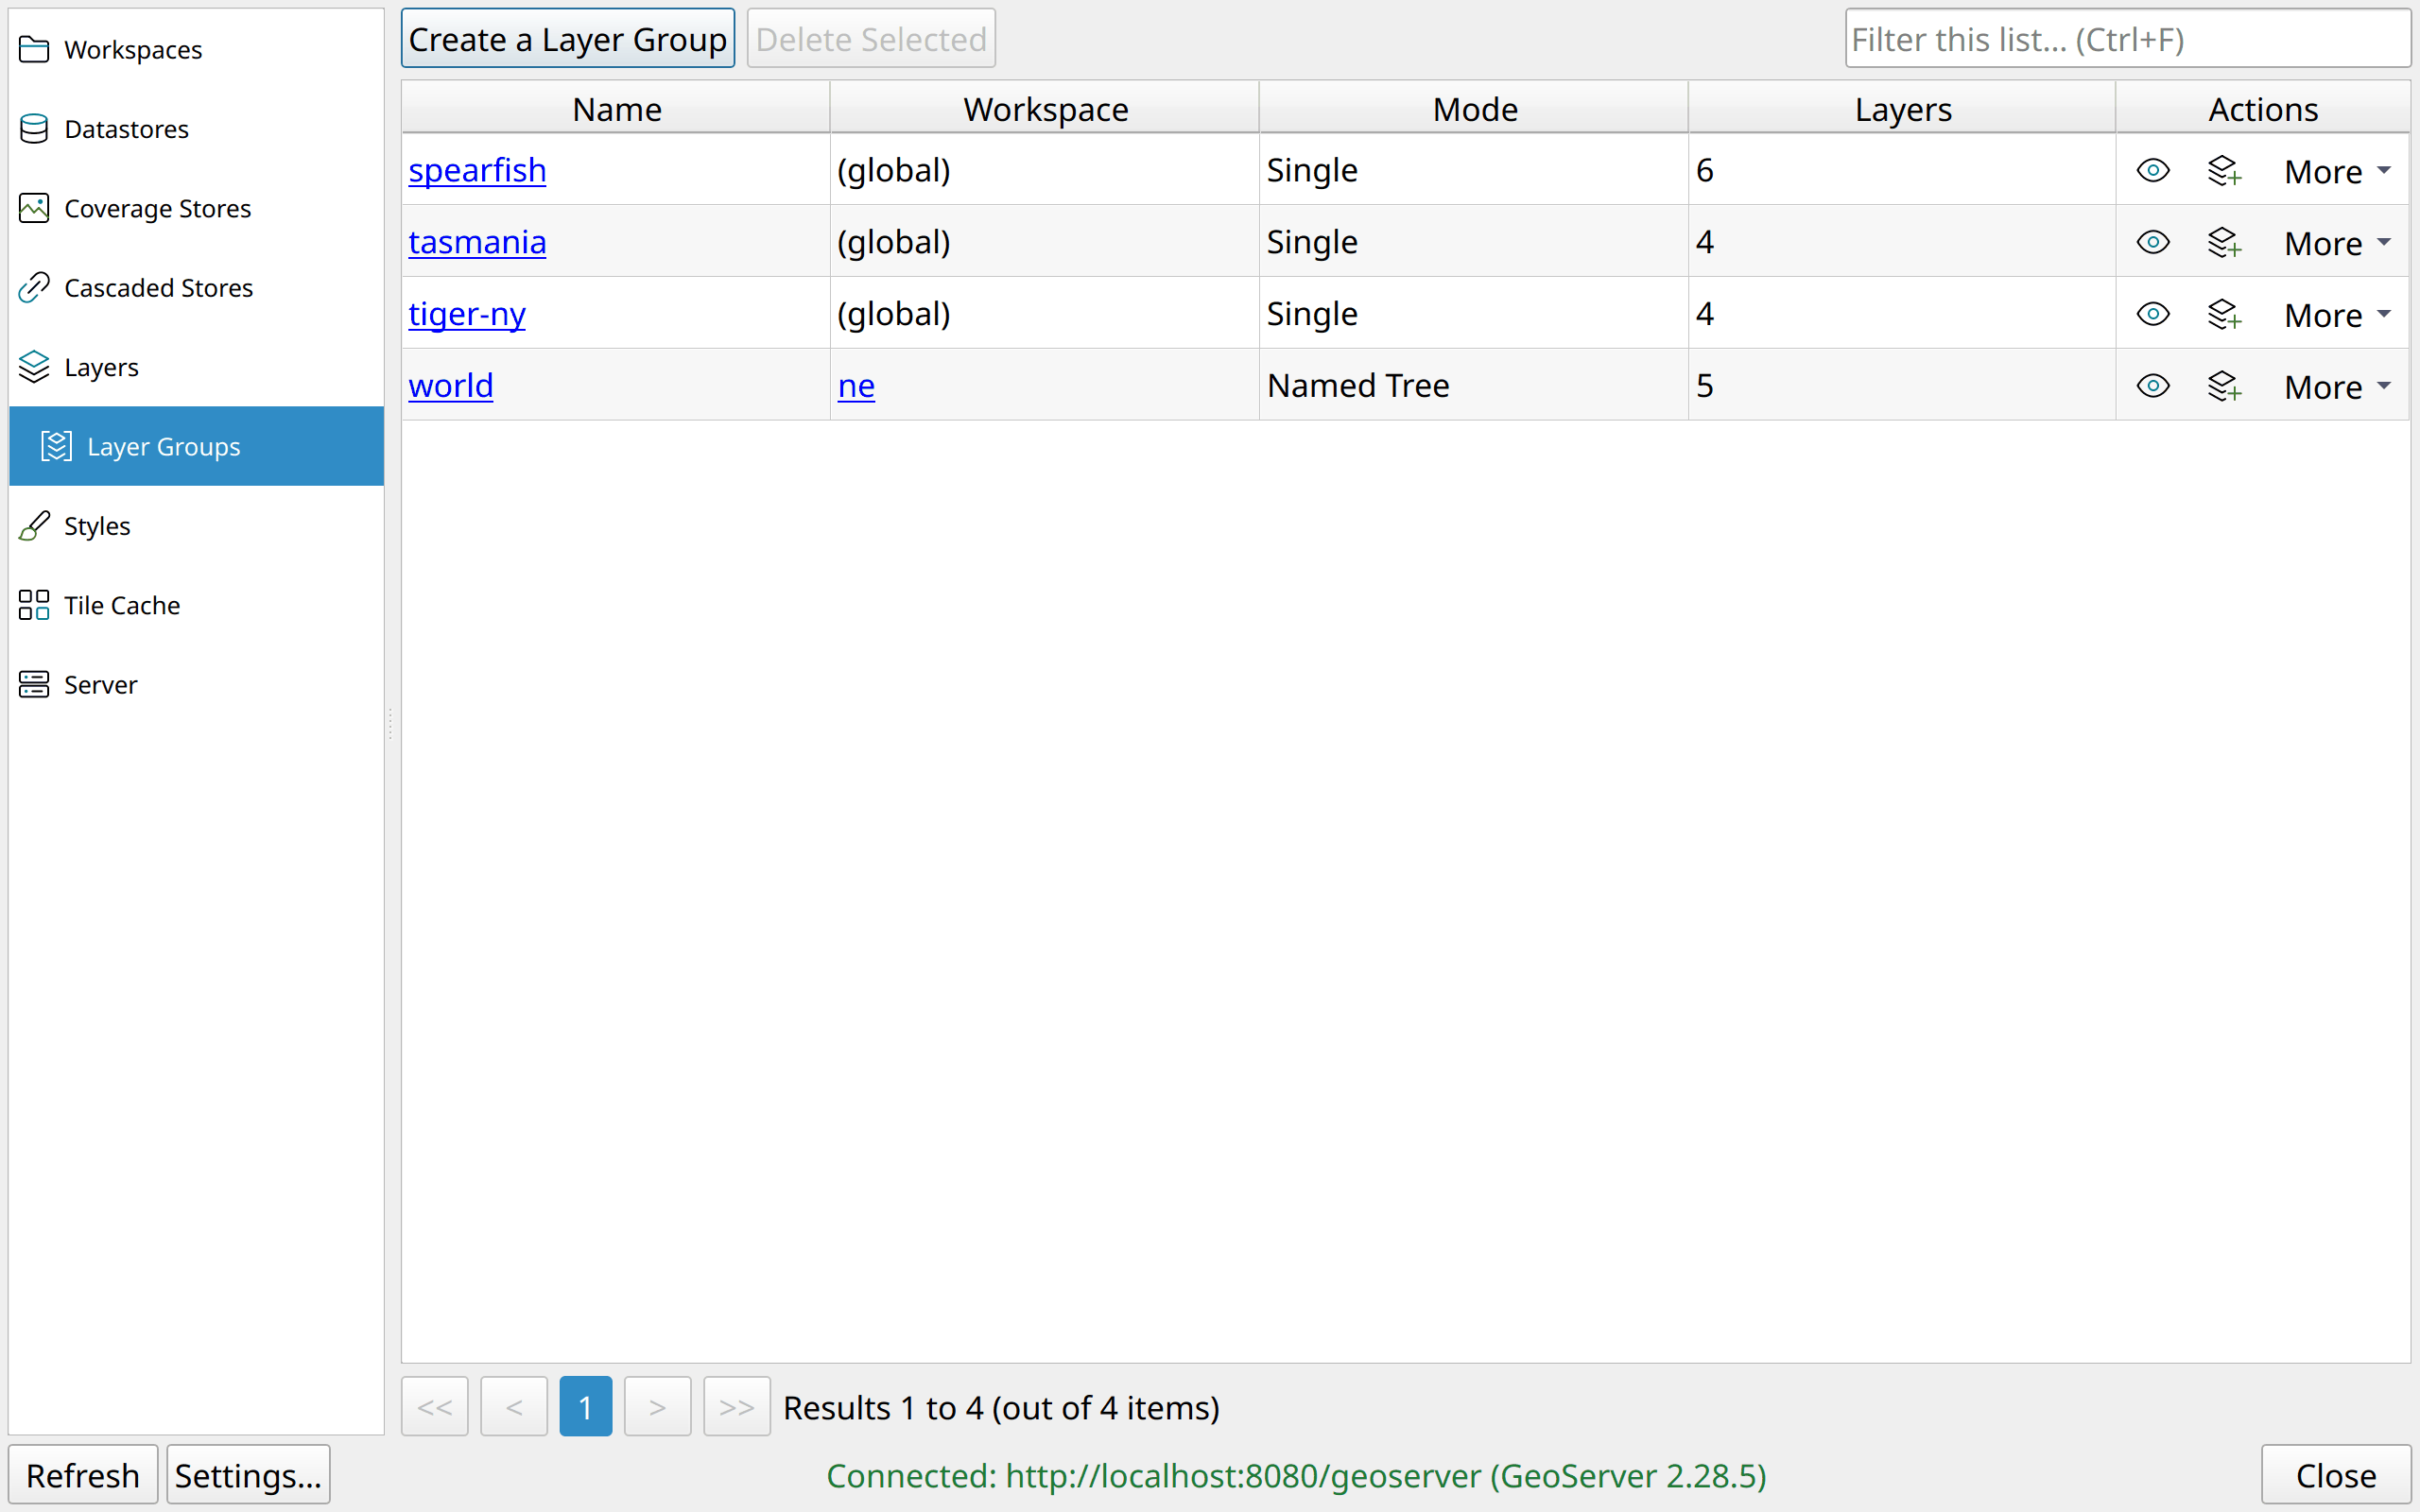
Create a Layer Group: give it a name, a title, an abstract and a mode. Then add the layers on the Layers tab: pick one (or type its name) and click the plus. Each row has a style picker; a blank one keeps the layer’s own default. The arrows move the selected row up or down. A row can also name another group, to nest it. GeoServer works out the bounds. An Earth Observation Tree also needs a root layer and its style (the default style of the layer when left blank).
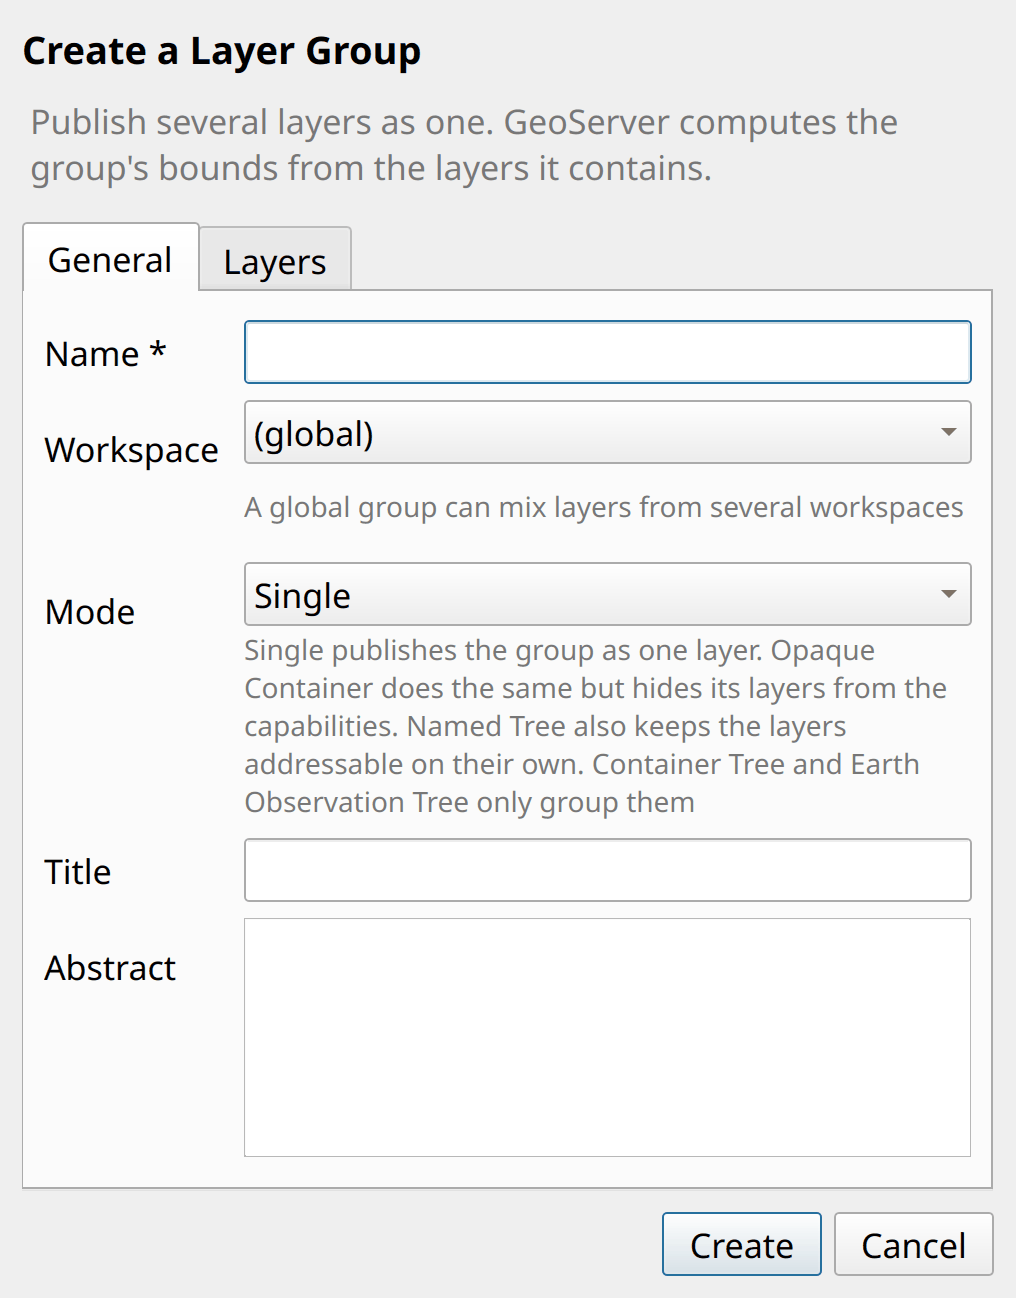
The Workspace column shows (global) for a group that belongs to no
workspace. Preview shows a group on a map of its own, with feature info
on a click, and leaves the project alone. Add to QGIS loads the group as
one WMS layer.
Click a name to edit a group: its mode, title, abstract, layers, order and styles, and whether it is enabled and advertised. An Earth Observation group also has its root layer there. When the layers change, the plugin recomputes the bounds of the group, because GeoServer does not do that on an edit. GeoServer does not allow two things: renaming a group, and taking an Earth Observation group out of that mode.
A delete removes the group only; its layers stay. A group that is inside another group is not deleted. Remove it from that group first.
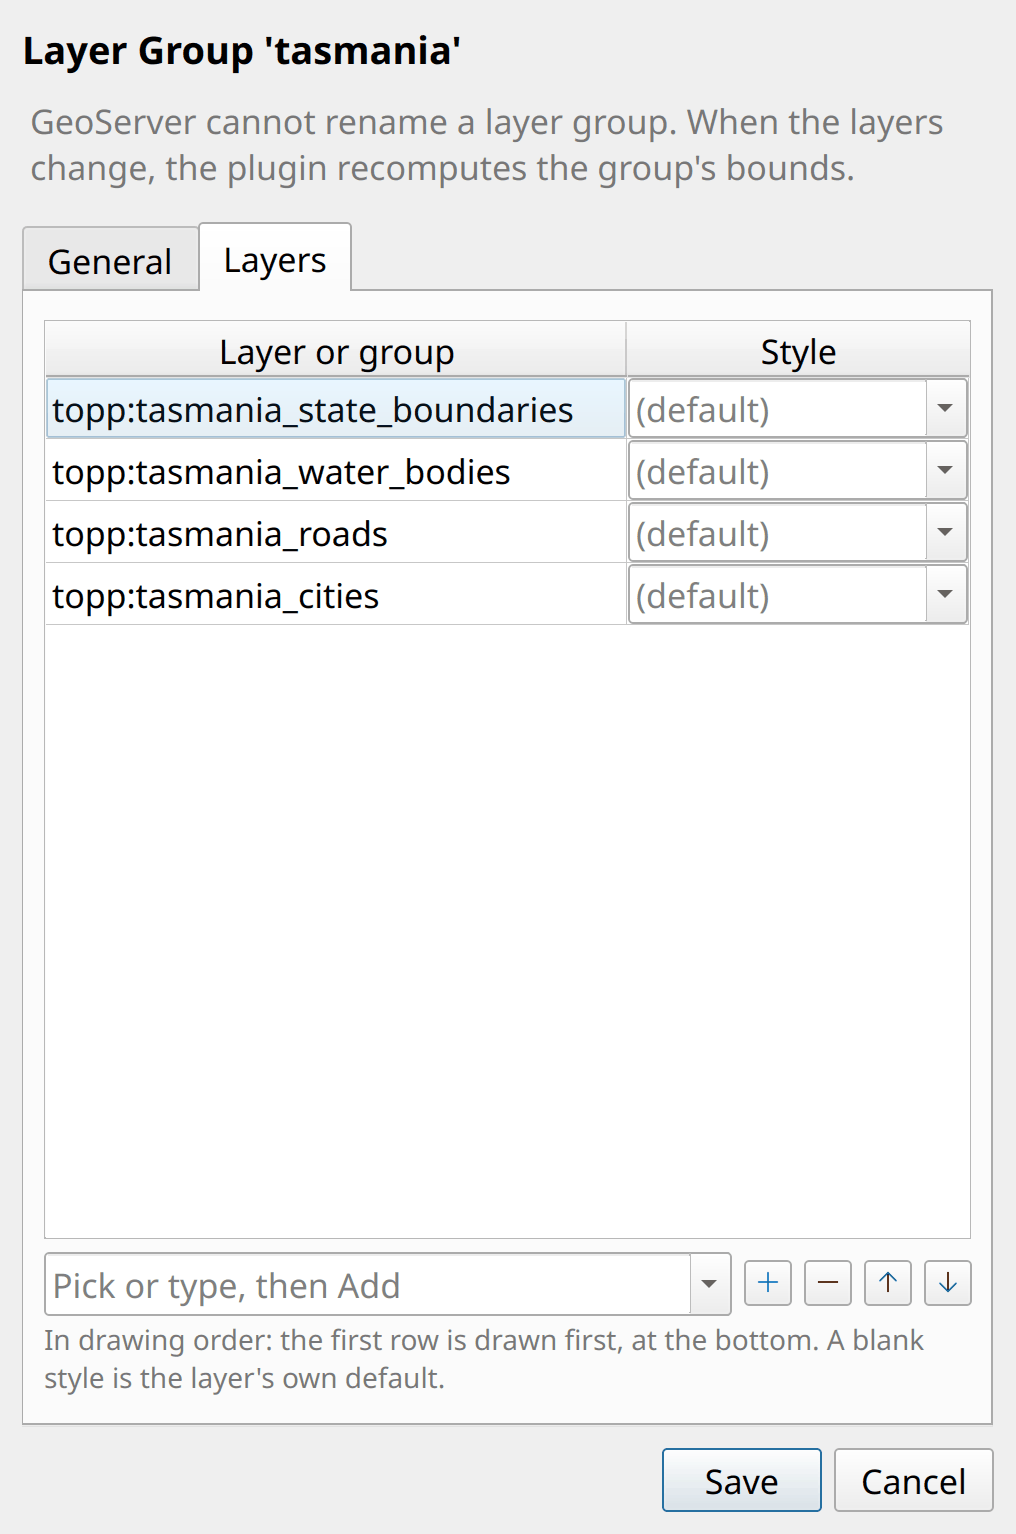
The first row is drawn first, at the bottom; the arrows reorder the rows.
Styles
Styles decide how GeoServer draws a layer.
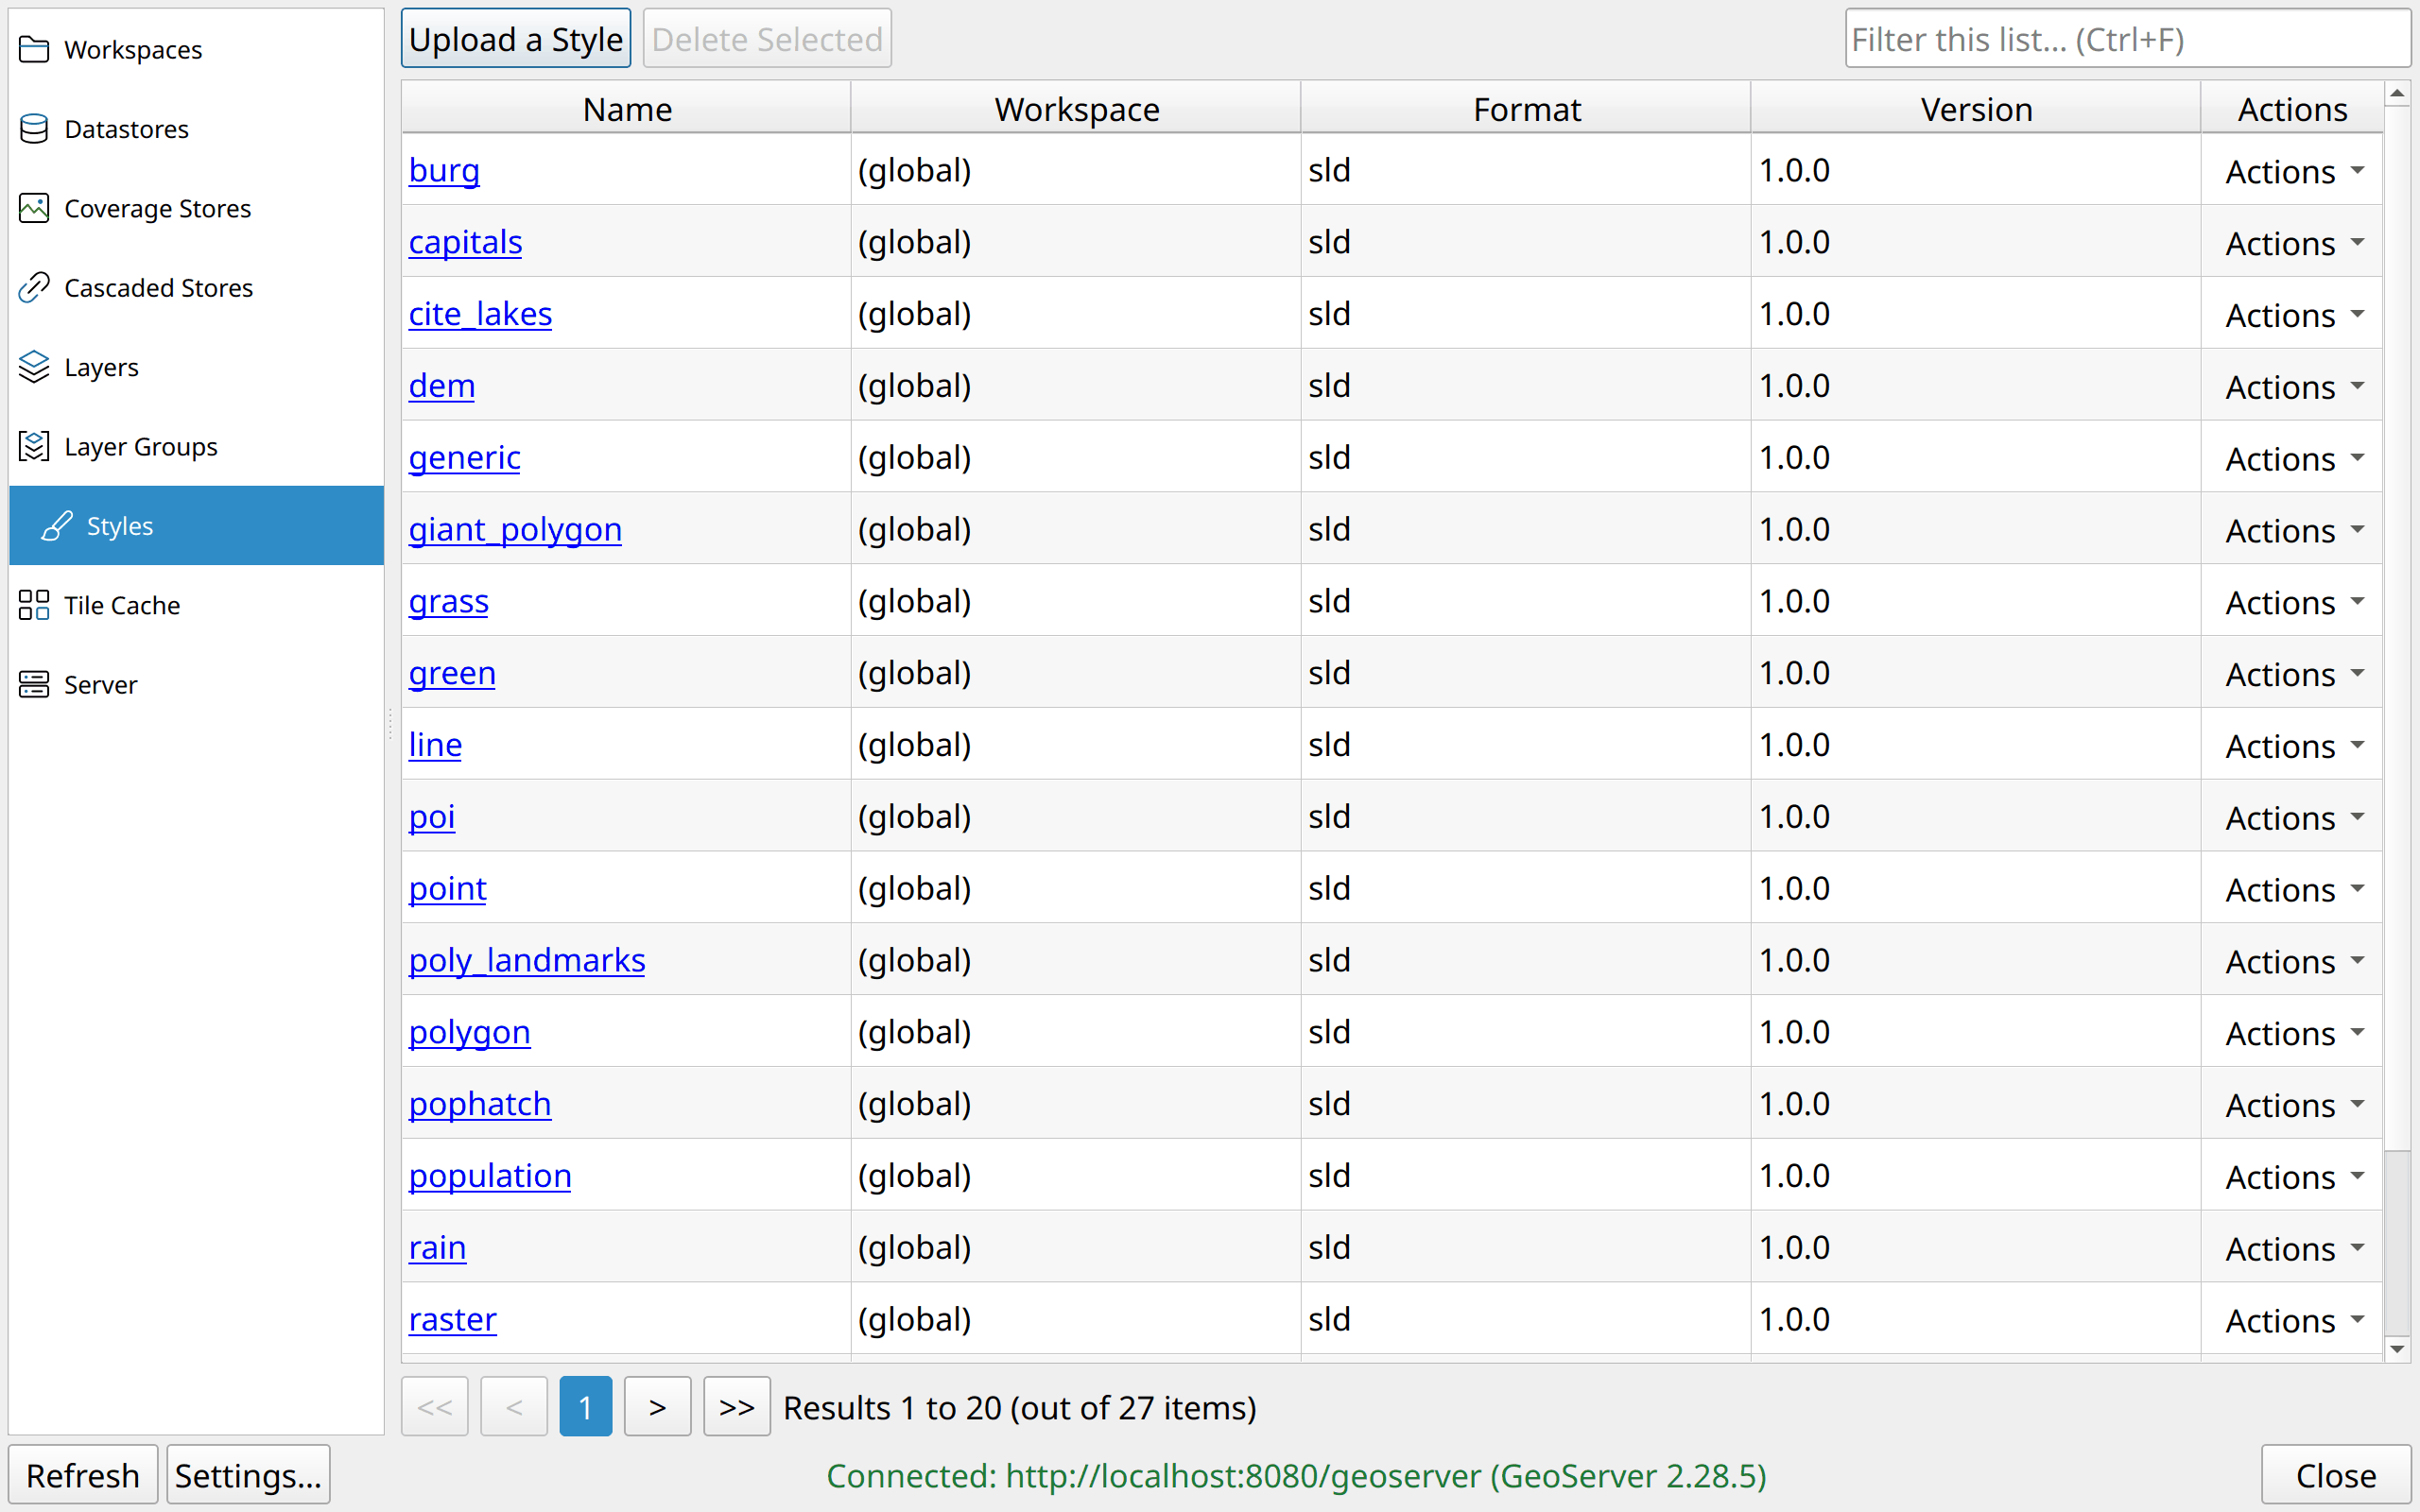
Upload a Style takes its definition from one of 3 sources:
Paste: paste the document, and pick its format: SLD, CSS, YSLD or MBStyle.
From file: an
.sld,.css,.ysldor.mbstylefile, or a.zipwith an SLD and its images.From a QGIS layer: the symbology of the layer, exported as SLD, with the SVG and image files its symbols draw. GeoServer takes SVG, PNG, JPEG, BMP and GIF files with a style. An icon in another format stops the upload, and the message names it, so that you can convert it. What QGIS cannot write as SLD, such as a label made from an expression or a heatmap, stops the upload with the reason QGIS gives.
You pick the QGIS layer from QGIS’s own layer list, with the icon of each layer. Two layers with the same name are two entries.
CSS, YSLD and MBStyle need their GeoServer extension. Without it, GeoServer refuses the style, and the message says so.
Click a name to view the style, with the legend GeoServer draws for it. The form opens on the Definition tab: edit the definition and save, to replace the style on the server. The editor is the code editor of QGIS, with line numbers, folding and highlighting for SLD, CSS and MBStyle, in your QGIS code editor colours. If GeoServer cannot read the definition, the message gives the line and the column. The Details tab holds the format, the version, the legend and the name of the style. Rename a style there; the layers and groups that use it keep it.
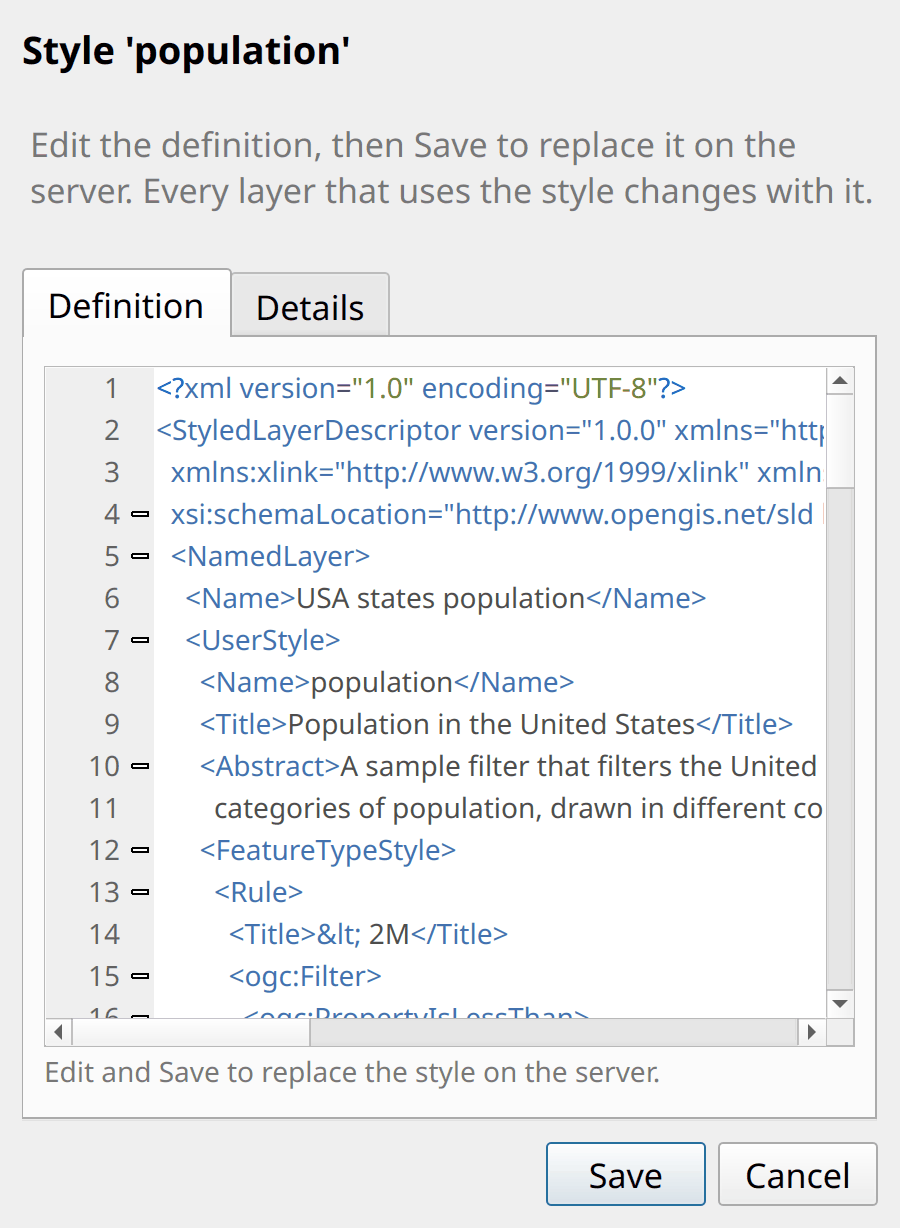
A style opens on its definition; the legend is on the Details tab.
Row actions:
Apply to a QGIS layer puts the style of the server on a vector layer of the project. QGIS cannot load an SLD into a raster layer. The plugin fetches the icons of the style from GeoServer. A CSS or YSLD style arrives as GeoServer converts it to SLD.
Save to disk saves the definition to a file.
Copy makes a new style from the same definition, under another name or in another workspace. The icons and fill images that an SLD points to beside itself are not copied. For another workspace, the form names the files the copy will draw without.
Used by lists the layers and layer groups that use the style. Check it before you edit or delete a style.
Delete deletes the style. GeoServer keeps its file in the data directory only as a
.bakbackup. Layers that used the style fall back to the default style of GeoServer.
Tile cache
The tile cache (GeoWebCache) stores map tiles, so that GeoServer draws them only once.
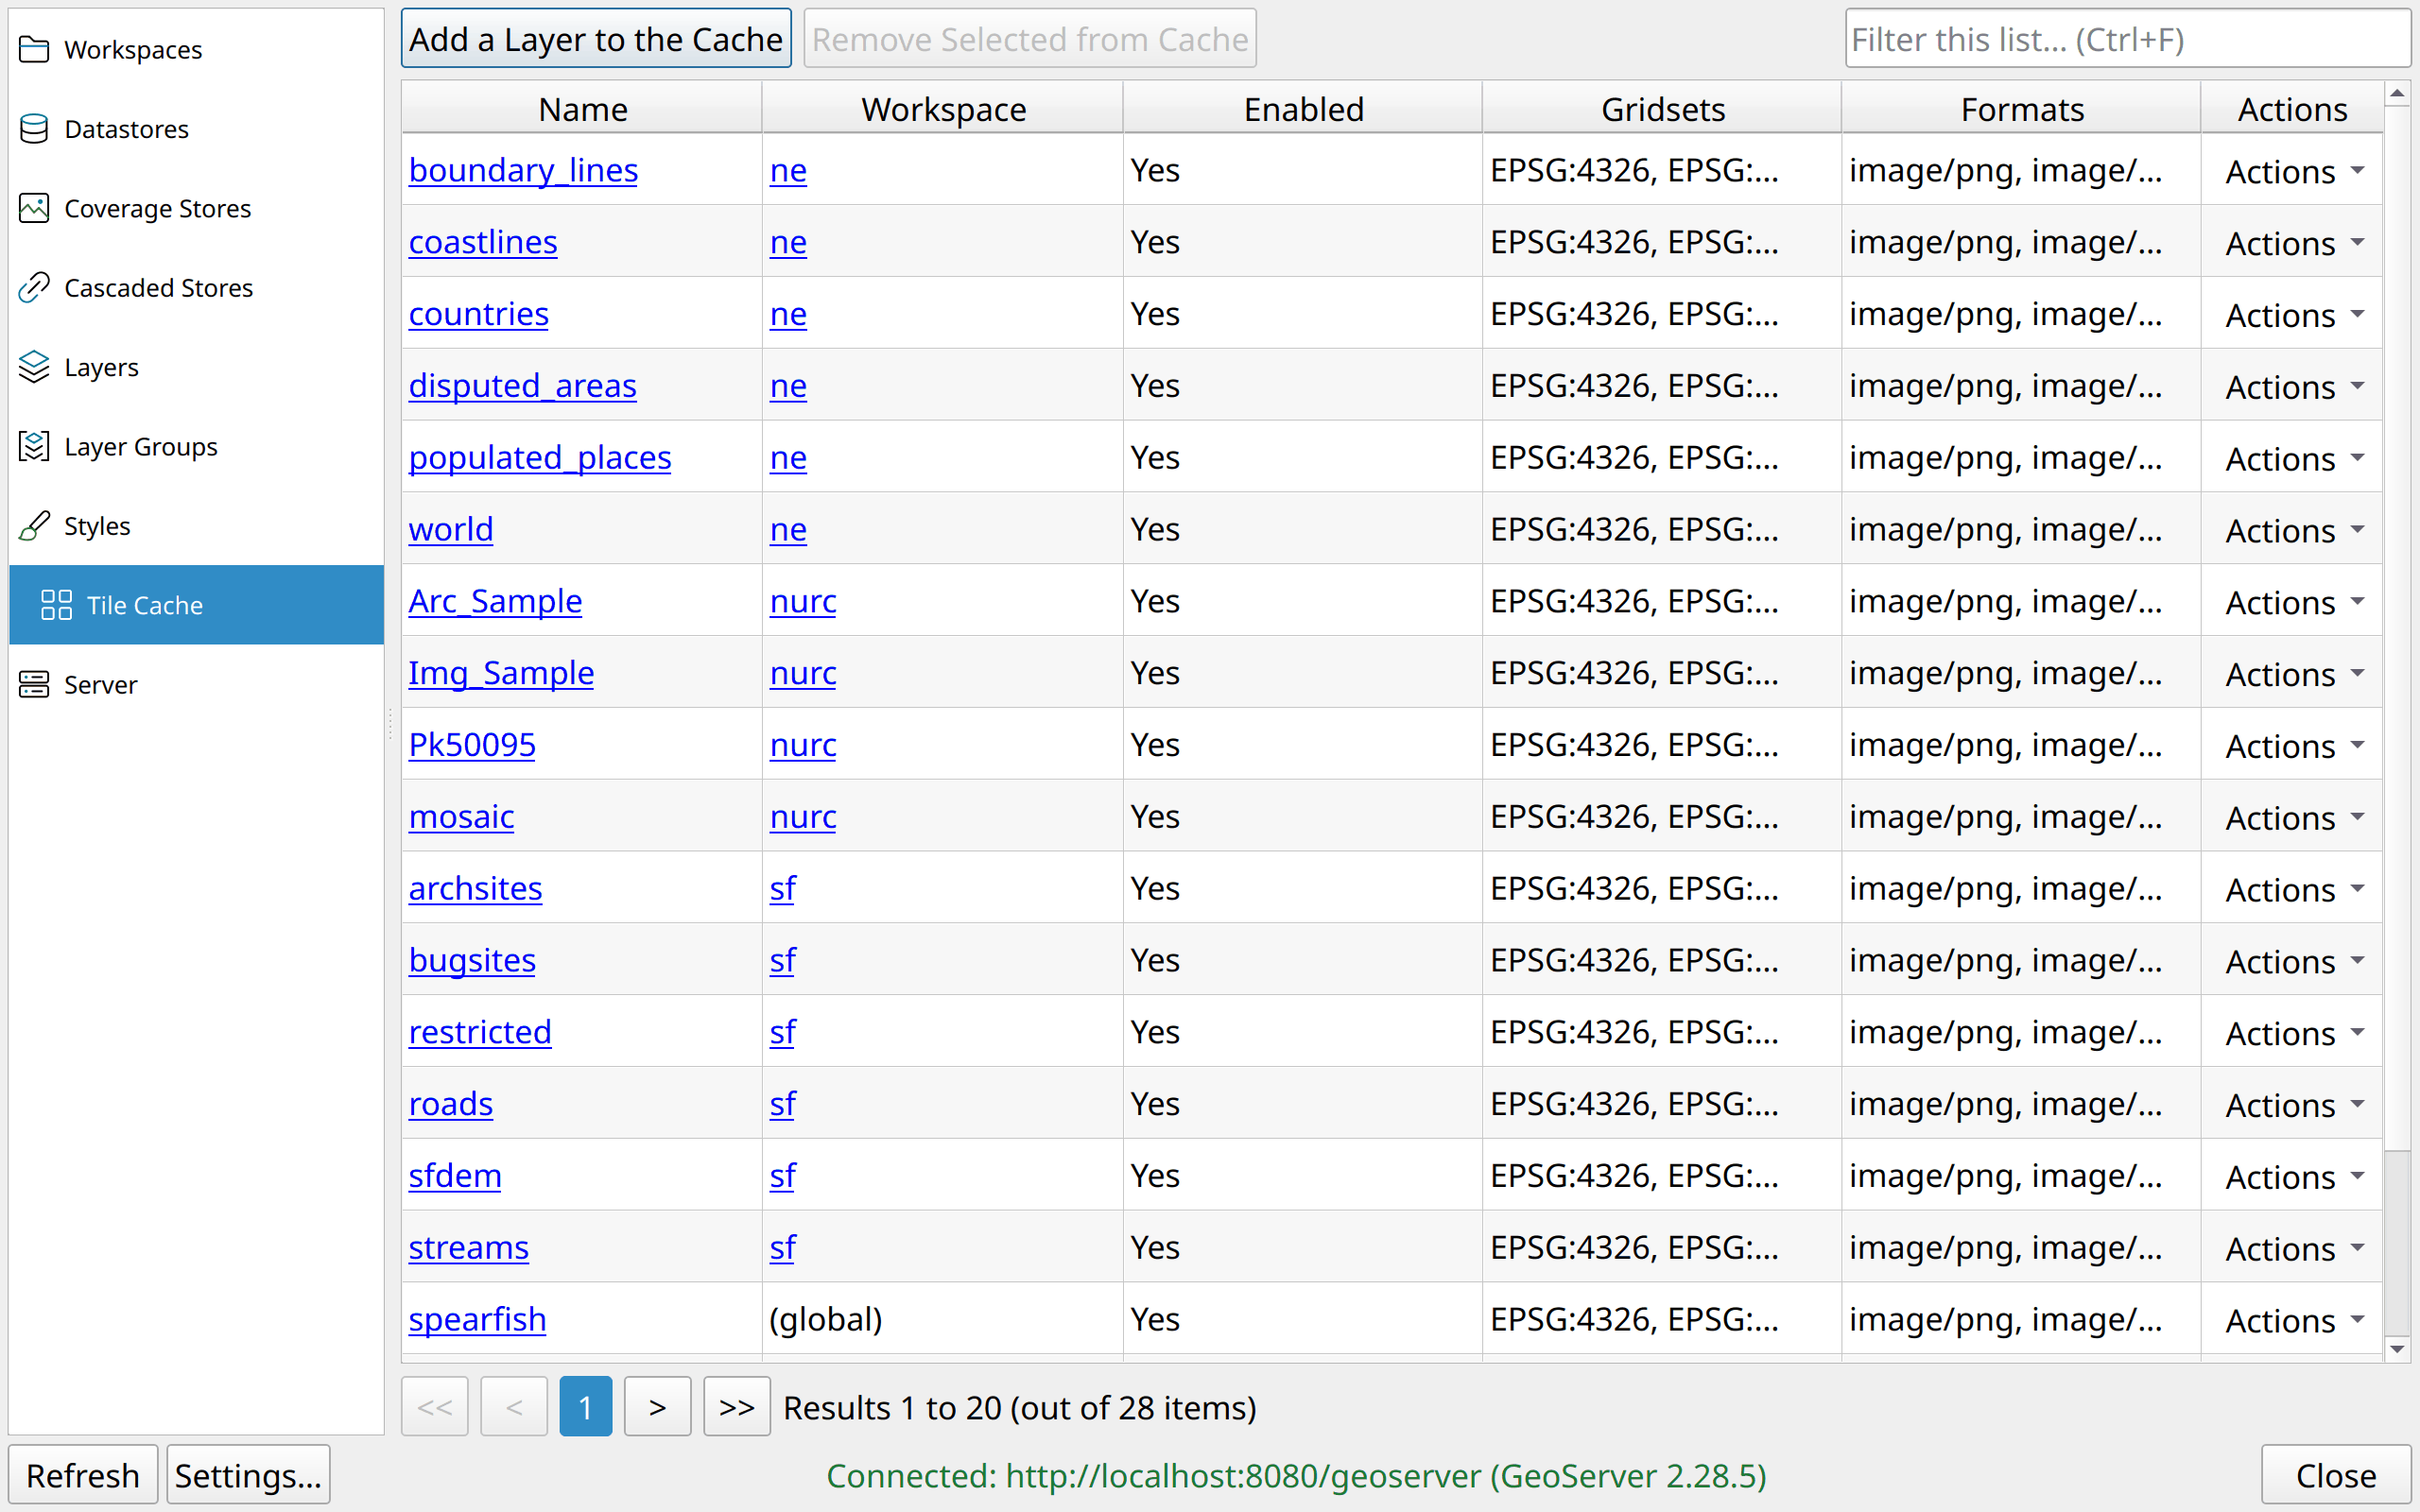
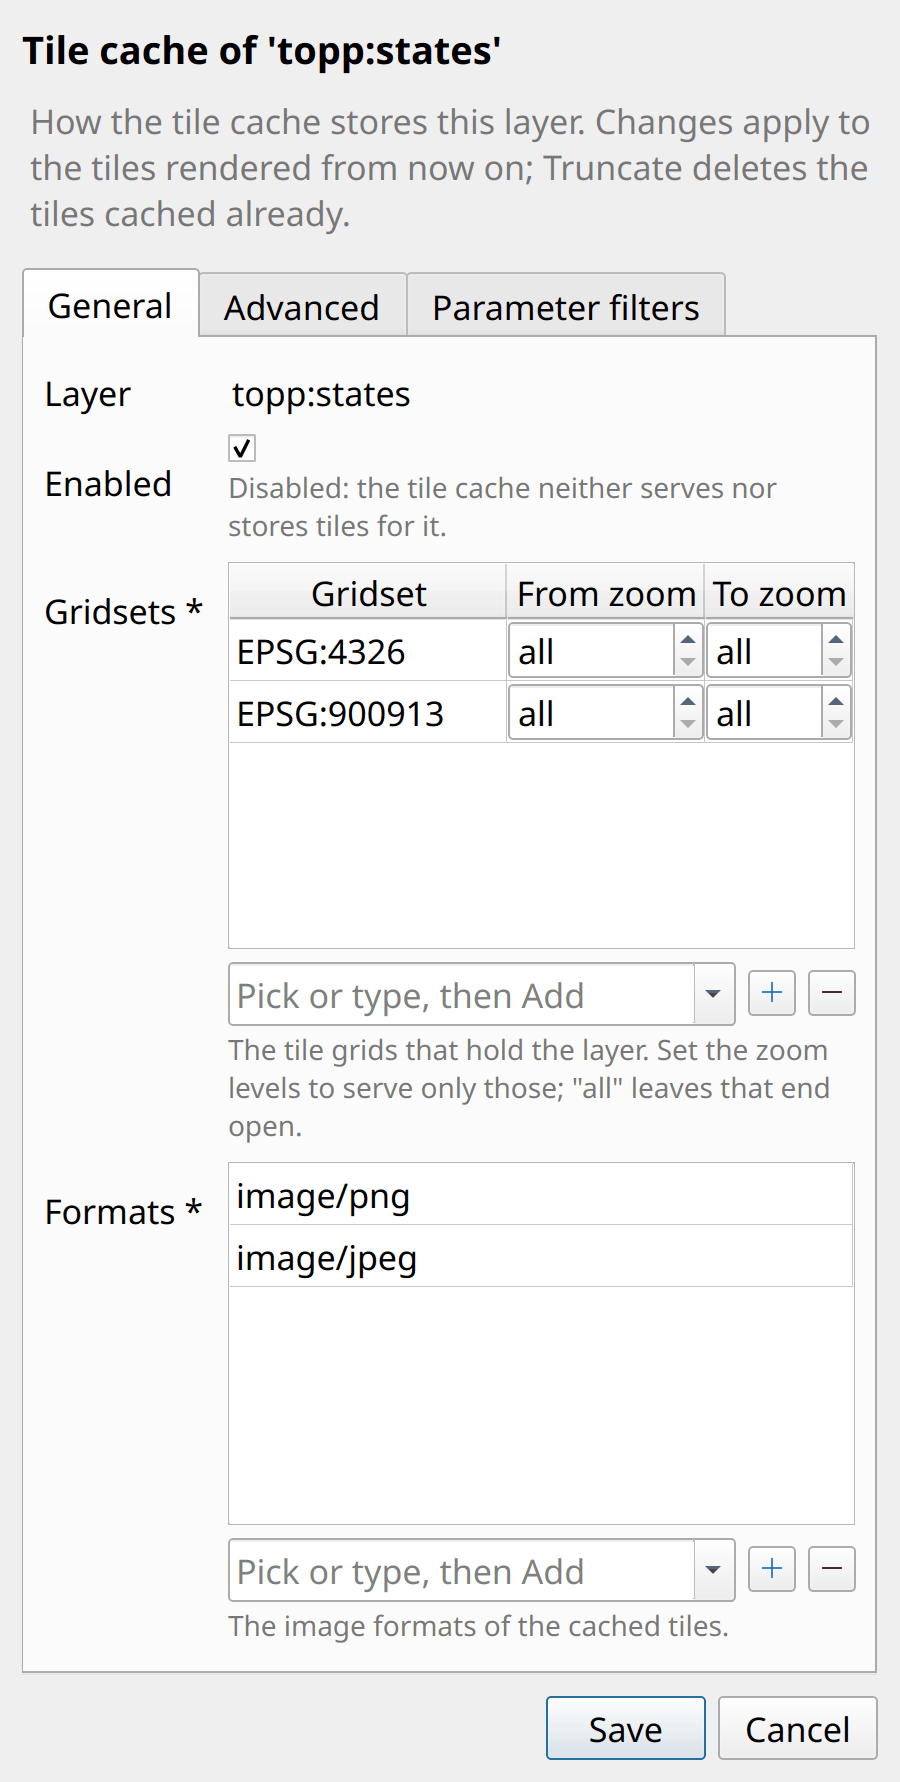
Click a name to change how a layer is cached: on or off, its gridsets
and its image formats, both picked from lists. Set the From zoom and
To zoom of a gridset to serve only those levels; “all” leaves that end
open. Meta-tiling, gutter and expiry are on the Advanced tab. The
Parameter filters tab holds the filters of GeoWebCache as XML: which
STYLES, CQL_FILTER or TIME values get a cache of their own. After you rename
a layer’s default style, check the STYLES filter. GeoWebCache can keep the
old name as its defaultValue, and a seed of the layer then fails.
Row actions:
Seed or truncate… renders the missing tiles (Seed), renders them all again (Reseed) or deletes them (Truncate), for one gridset, format and zoom range. On the Advanced tab, limit the task to an area, or to one parameter value (the parameter
STYLES, the valuepopulation). Take the area from the map view, a layer or a bookmark, or type it in the order QGIS uses: xmin, xmax, ymin, ymax. The plugin sends the area in the CRS of the gridset. A Truncate asks first, as the row action does. GeoWebCache runs the task in the background, and the task list opens.Tasks shows the running tasks of the layer, refreshed every 2 seconds, with how many tiles are done. Stop all ends them.
Truncate (the eraser) deletes all the cached tiles, in every gridset and format. GeoWebCache draws them again when someone asks for them.
Remove from cache (the minus) stops caching the layer. The layer itself stays published.
Add a Layer to the Cache offers the layers and layer groups not cached yet.
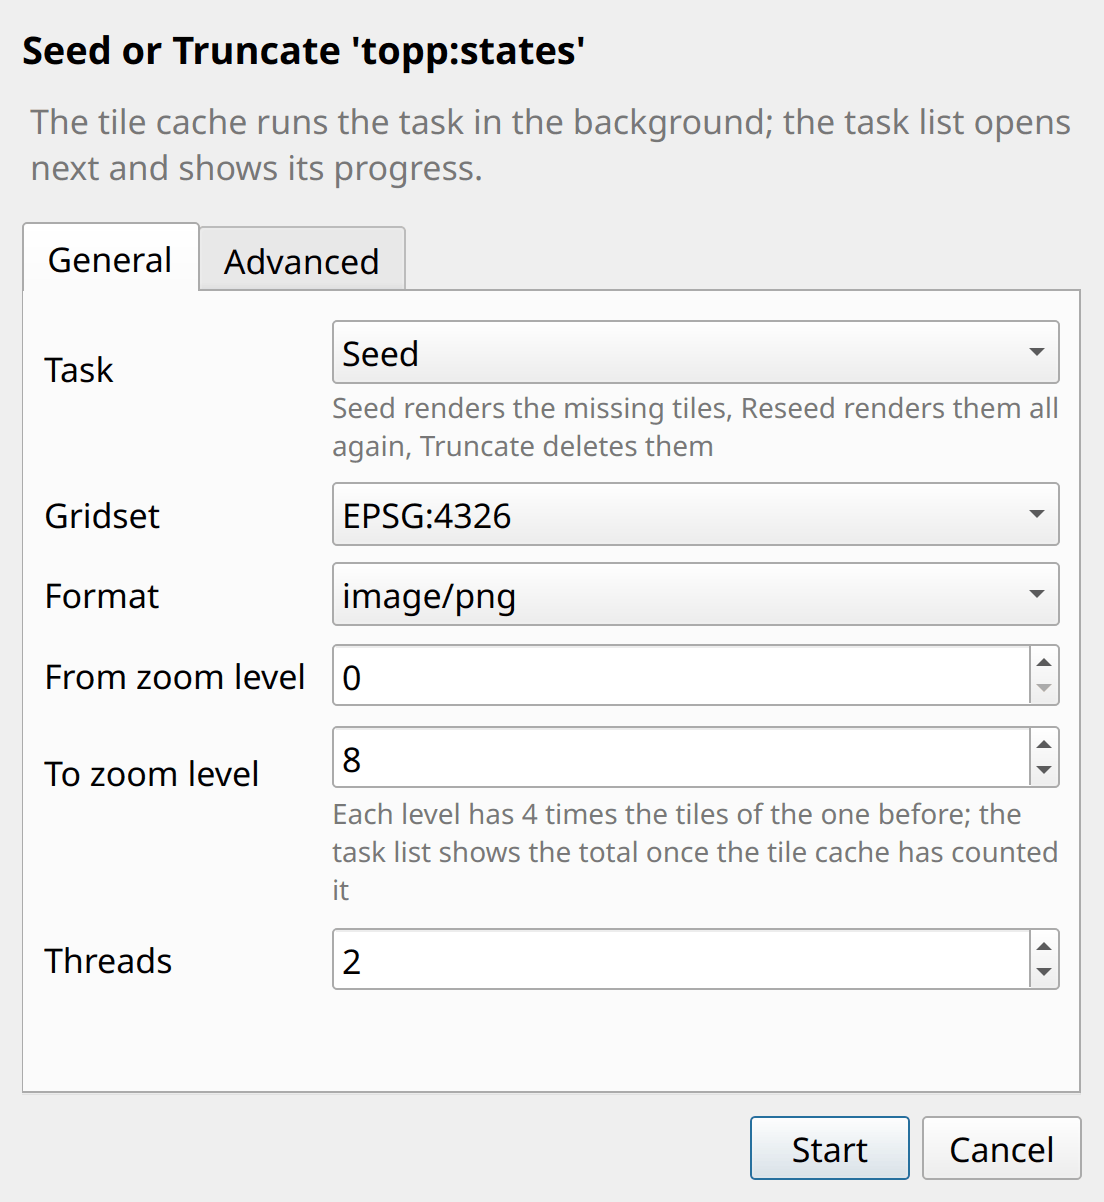
Each zoom level has 4 times the tiles of the one before.
Server
The settings that belong to the whole GeoServer, one row each. Click a row to change it. Open in the web interface opens GeoServer’s own page for it.
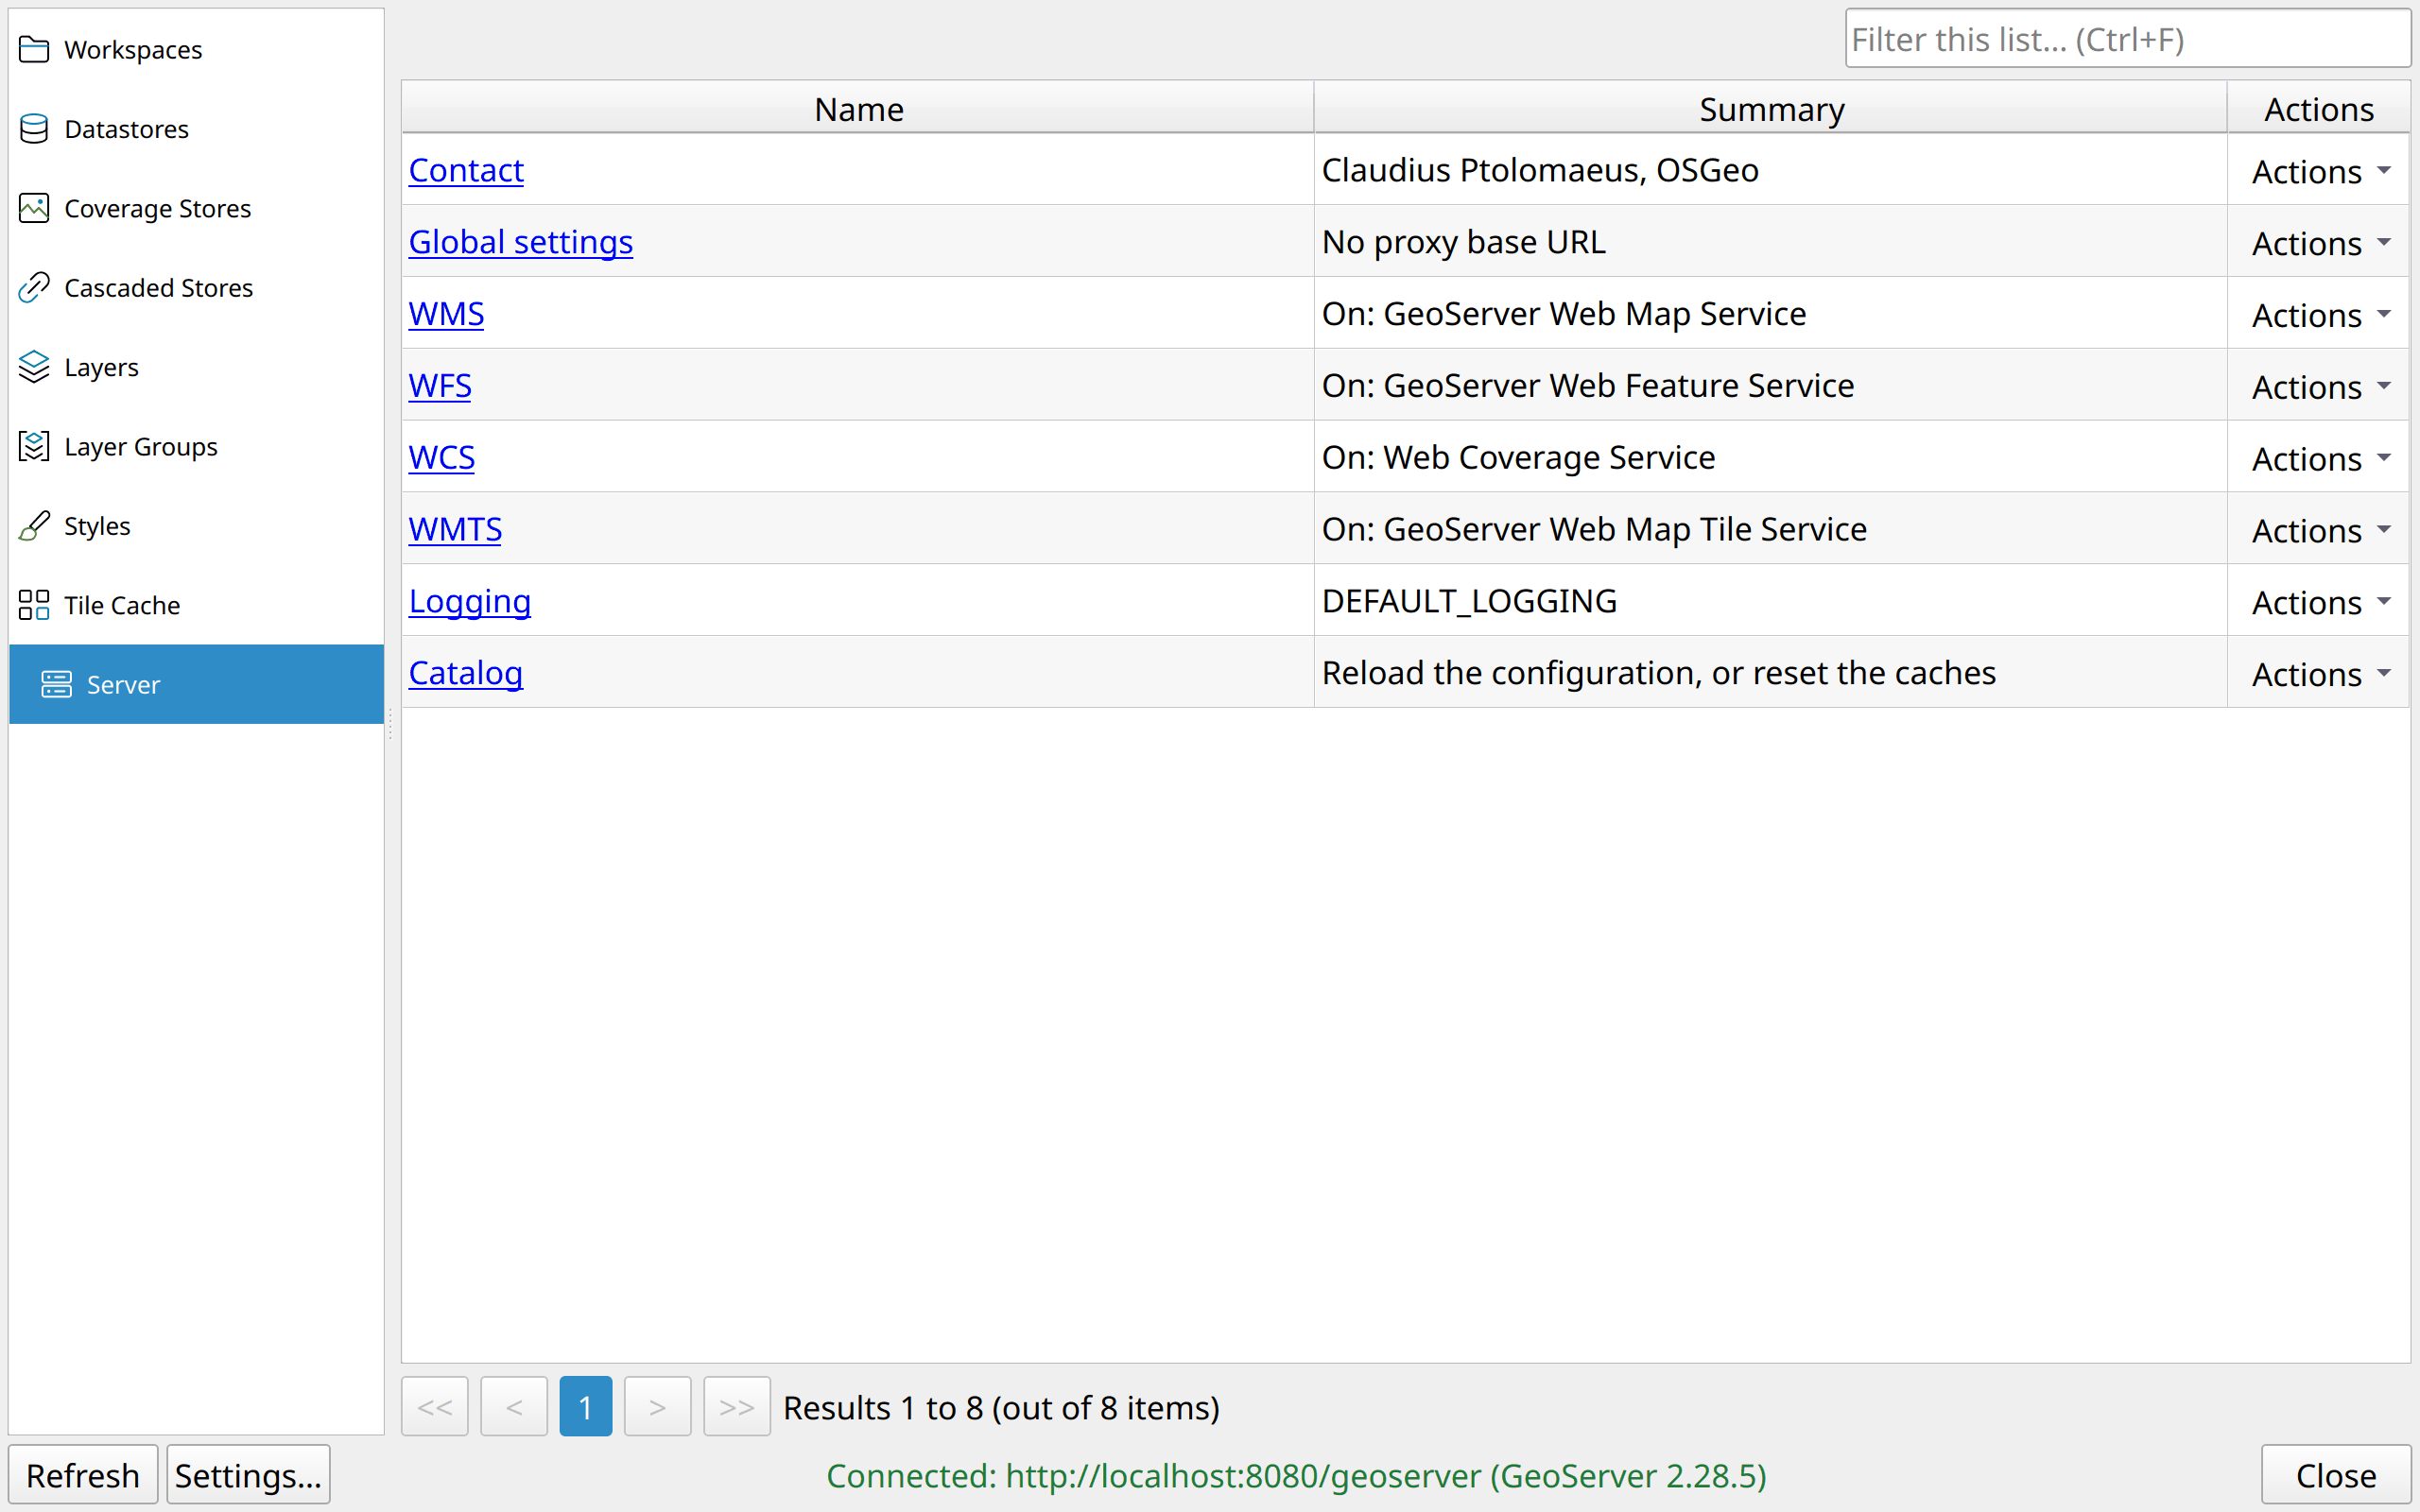
Contact: the person, organization and address that the capabilities documents and the home page of GeoServer show.
Global settings: the proxy base URL, the character set, the number of decimals, and verbose output. The proxy base URL is the address GeoServer writes into its capabilities when it sits behind a proxy.
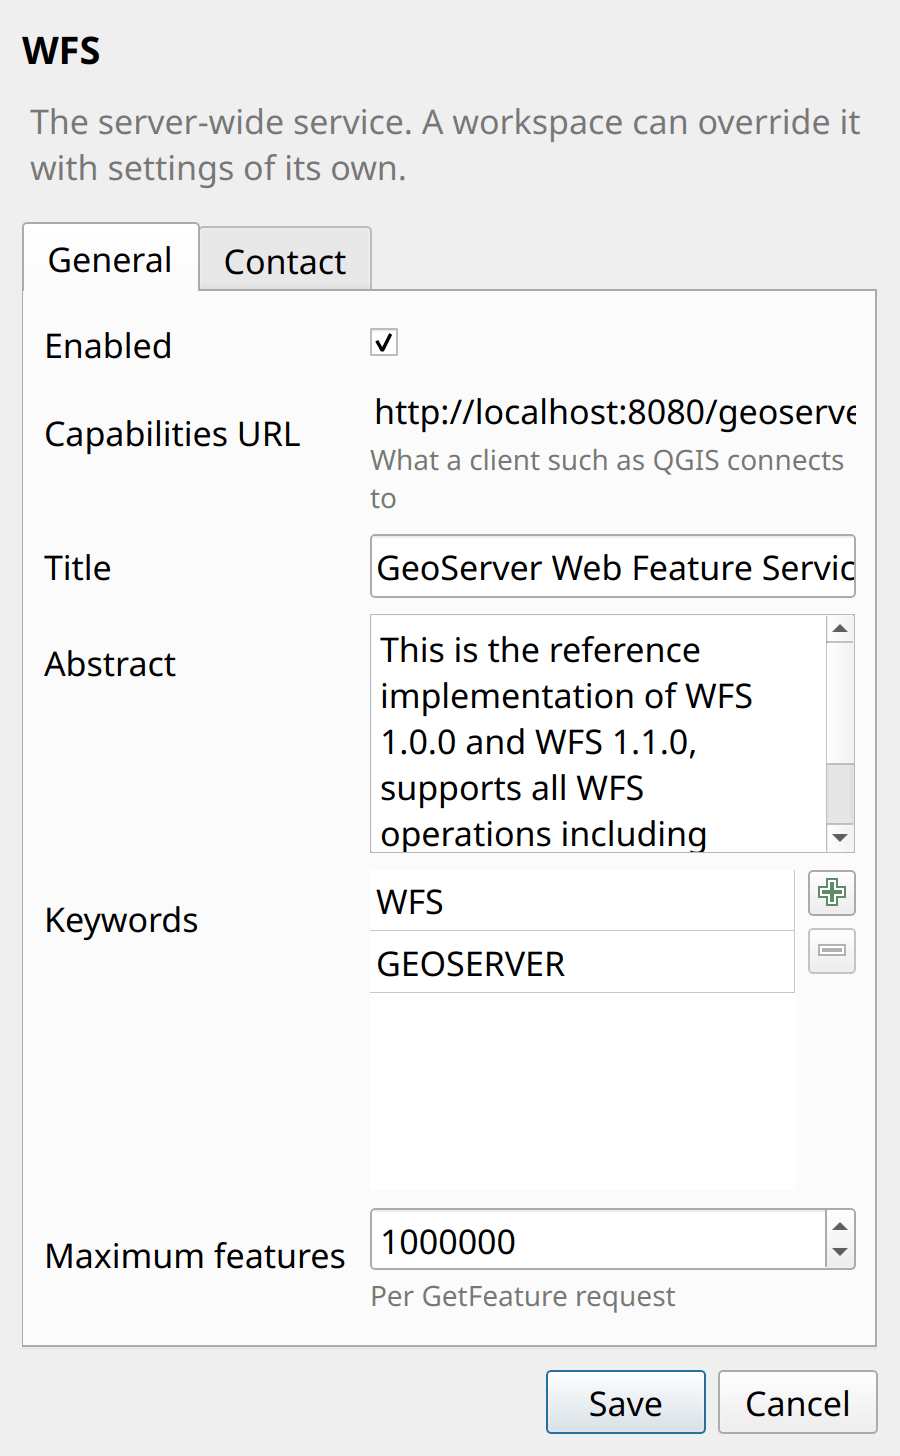
WMS, WFS, WCS, WMTS: each service on or off, with its title, abstract, keywords and contact lines, and for WFS the maximum features per request. The form also gives the capabilities URL, the address to connect QGIS to.
Logging: the logging profile and the log file. Show the log opens the last 500 lines. GeoServer 3 has no log file setting, so the form shows none there.
Catalog: Reload reads the whole configuration from the data directory again, after it changed outside GeoServer. Reset drops the caches of stores, feature types and styles.
From the layer tree
Right-click a layer in the Layers panel of QGIS to find the GeoServer Manager submenu:
Push style to GeoServer… sends the symbology of the layer to the matching server layer. You confirm the target and the style name first.
Apply style from GeoServer… puts the style of the server layer on the QGIS layer. It is greyed out for a raster layer, because QGIS cannot load an SLD into one.
Publish to GeoServer… opens the plugin on the Layers tab, with the Publish a Layer form set to this layer. Pick the workspace, check the name, and publish. The upload shows its progress there, and the new layer appears in the table when it lands.
With several layers selected, the entry reads Publish 3 layers to GeoServer…. One short form asks for the workspace, Replace and the style, and lists the name each layer gets. The layers then upload one after another. The plugin reports a layer that fails, and skips it. Cancel stops the rest, and a closing message says what was published and what was not. The plugin refuses two layers that would get the same GeoServer name before anything is sent: rename one in QGIS first.
For the two style entries, the plugin matches a layer loaded from the server through its source, and any other layer by its name.
Keyboard shortcuts
Key |
Does |
|---|---|
F5 |
refresh: reconnect and reload the open tab |
Ctrl+F |
go to the search box |
Esc |
clear the search; if it is empty, close the dialog |
Enter |
open the selected row |
Del |
delete the selected rows |
Tab, then Enter or Space |
use the button of a row |
When the connection fails
The status line at the bottom of the dialog says what went wrong:
Status |
Meaning |
What to do |
|---|---|---|
Not configured |
no URL, or no user name and password, saved |
open Settings |
Auth error |
the user name and password cannot be read: the master password was declined, or they are gone from the authentication database of QGIS, or they are not a user name and password |
open Settings and enter them again |
Server unreachable |
nothing answers at that address (after 10 s at most) |
check the URL, the network, and that GeoServer runs; behind a proxy, see network settings |
Proxy refused |
the proxy did not pass the request on: it is unreachable, cannot reach GeoServer, or wants a user name and password (HTTP 407) |
check the proxy in the Options of QGIS, on the Network tab, then Refresh |
Certificate not trusted |
this machine does not trust the TLS certificate |
for a private CA, set |
Authentication failed |
GeoServer refused the user name or password (HTTP 401) |
check them in Settings |
Not allowed |
the account is not allowed to use the REST API (HTTP 403): GeoServer accepted it, but no REST rule lets it in, or a proxy in front of GeoServer blocks |
ask a GeoServer administrator for REST access ( |
Not the base URL |
the URL is another address of the server, such as the |
put the base URL the message names in Settings |
Redirected |
the address sends every request elsewhere, such as |
put the address the message names in Settings |
HTTP error N |
something answered, but not the REST API |
check the URL; it usually ends in |
Not a GeoServer REST endpoint |
a web page came back, such as a proxy login page |
check the URL, or the proxy in front of GeoServer |
The full details go to the log panel of QGIS, on the GeoServer Manager tab.
Supported GeoServer versions
GeoServer Manager is developed against GeoServer 2.28: every server behaviour it relies on was measured on 2.28.5. It is also tested as a whole on GeoServer 3.0.1. The status line names the version of the server it is connected to. On another version the dialog works as usual, and says once that the version is not the tested one.
Server |
What to expect |
|---|---|
GeoServer 2.28 |
tested |
GeoServer 3.0 |
tested on 3.0.1. Known differences: it has no log file setting, so the logging form shows none, and its GeoWebCache answers a layer it does not cache with HTTP 500 rather than 404 |
GeoServer 2.27 |
not tested as a whole. Known differences: its GeoWebCache answers a layer it does not cache with HTTP 500 rather than 404, and most datastores of its demo data have no type |
GeoServer Cloud |
recognised, and named in the status line with its own version (GeoServer Cloud 2.28.5.1). Not tested as a whole; the known differences are below |
On GeoServer Cloud (measured on 2.28.5.1):
There is no GeoServer log file: each service logs to its standard output, which the deployment collects. The log on the Server tab is missing or empty, and the logging settings are saved but change nothing.
With the
pgconfigcatalog backend, GeoServer creates a layer or raster published from QGIS. But the WMS and WFS services cannot open the uploaded file, which stays with the REST service. Publish a table of a database that all services reach, such as PostGIS, instead.An error answer carries no reason: a refused style says HTTP 400, without the line and column GeoServer found wrong.
Good to know
Nothing is cached. Every tab switch and every Refresh fetches the list again. The names come first. The other columns of the page on screen follow a moment later, and show “…” until then. So a large server does not load the details of every row up front. The search box matches the columns loaded so far; sorting on a column loads it for every row first.
Deleting a store created from an upload leaves the uploaded file in the data directory of GeoServer.
The TLS setting of the plugin does not reach the WMS and WFS layers of QGIS. A layer added to QGIS uses the certificate handling of QGIS. For a private CA, import the CA into the certificate manager of QGIS (see a private certificate authority).
Behind a proxy, GeoServer writes its own idea of its address into its capabilities. That is the Proxy base URL of the Global settings on the Server tab, or else the host name the proxy passes on. When that is not the address the plugin connects to, WMS and WMTS layers added to QGIS still use the address of the plugin. A WFS layer would follow the other address, with the user name and password, so Add to QGIS refuses it and names that address.
The plugin keeps the password as plain text in your QGIS settings. That changes when Keep the password in QGIS’s encrypted authentication database is ticked for the connection on the settings page. Plain, the password is also in the source of every layer the plugin adds, so a saved project holds it. Encrypted, QGIS asks for its master password once per session. Let QGIS remember that password in your system keyring (Settings, Options, Authentication) to stop the prompt.
Over plain
http://to a remote server, the password travels unencrypted. The plugin warns once, when you save the settings.An account that is not a GeoServer administrator sees only what it administers. The status line then says Connected as a non-administrator. An empty tab says that GeoServer lists nothing this account administers there. GeoServer refuses a change outside what the account administers (HTTP 403).
The interface follows the QGIS theme, dark themes included. A partial French translation exists; contributions are welcome.